Replacing the VAZ 2110 engine cushions is a very important and responsible procedure. It should be carried out, if necessary, as early as possible, while a malfunction of seemingly small details did not lead to vibration along the way and, as a result, quick wear of the main elements of the transmission, as well as global engine breakdowns.
When should you replace?
Replacing the engine mountings, as noted earlier, must be carried out at the first detection of their malfunction. It is not difficult to recognize this malfunction, of course, if only to regularly inspect this unit of the car - then all the slightest cracks, delamination, "tanning" and complete destruction of the rubber band of the pillow will not go unnoticed and will not have time to harm the engine.
How can I check the condition of the pillows now?
- Jack up the vehicle. Free the latter by fixing the position of the car with special repair props.
- Place a jack under the oil pan, separating them with a small piece of wood - it will help to evenly distribute the pressure when lifting, which will protect the pan from deformation.
- Raise the motor carefully so that its mass is transferred from the supports to the jack.
- Examine the rubber pads for visual defects, the most dangerous of which, by the way, is a crack in the central part of the part.
- If everything is visually in order, evaluate the play between the motor and the cushion plates. It should not be there, otherwise lower the engine into place and tighten the mountings for the supports.
Now let's return to the situation when visual defects on the pillows are still present, therefore, the named parts need to be replaced.
How to replace the VAZ 2110 engine cushions: step by step instructions.
Replacing the right engine mount.
1. Prepare the necessary tools and materials: a set of wrenches, a marker, a jack, crowbar, repair posts, plastic bags, and retention sealant.
2. With the ignition off, disconnect the negative terminal from the battery.
3. Place the machine on the repair stands and raise the engine using the technique described above. Do this as carefully as possible so as not to damage the fan shroud and radiator.
4. Disconnect the support from the frame. To do this, remove the through bolt after loosening the corresponding nut.

5. Taking into account that this is the first time you are doing this kind of work, put all the removed parts, bolts, etc. into packages numbered with a marker. This will make the assembly easier for you later.
6. Extremely carefully remove the old engine mount and install a new one, having previously lubricated the bolt threads with a prepared sealant.
7. Assemble everything in reverse order.
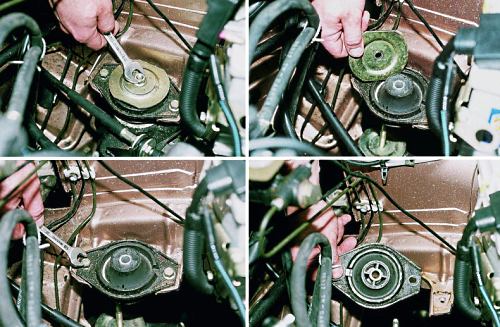
Replacing the left engine mount (photo).