If part of the VAZ 2109 cars have a high panel, then the other part is low. Schemes are somewhat different, because we bring to your attention a detailed description of the instrument panel and the instrument panel of nine with a low panel.
We will get acquainted with the diagram of the dashboard and its components, based on the image below.
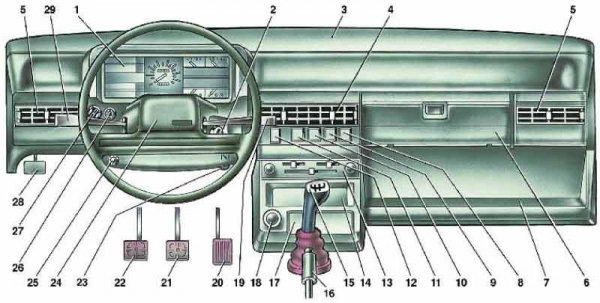
This scheme has the following elements.
|
room |
What is it |
|
Combination of devices |
|
|
Ignition switch |
|
|
Central nozzles of heating and salon ventilation |
|
|
Side nozzles of the heating system and ventilation salon |
|
|
Bardac lid. |
|
|
Plug |
|
|
Glass Heating Switch on Rear Doors |
|
|
Return Optics Rear Switch |
|
|
Alarm switch |
|
|
Central Outside Light Switch |
|
|
Heating and Salon Ventilation Control Panel |
|
|
Nest of the radio |
|
|
Gearbox lever |
|
|
Manual parking brake lever |
|
|
Ashtray |
|
|
Cigarette |
|
|
Windshield washer control lever and wiper |
|
|
Gas pedal |
|
|
Brake pedal |
|
|
Clutch |
|
|
Handle of the closing of the air damper |
|
|
Switch Klason |
|
|
Dummy Damage Data Damage Pen |
|
|
Dashboard Backlight Switch |
|
|
Handle control of the hydro director |
|
|
Hood Castle Drive Lever |
|
|
Light control lever and turn signals |
Combination of devices
As for the combination of devices in the VAZ 2109 with a low panel, it has the following scheme.
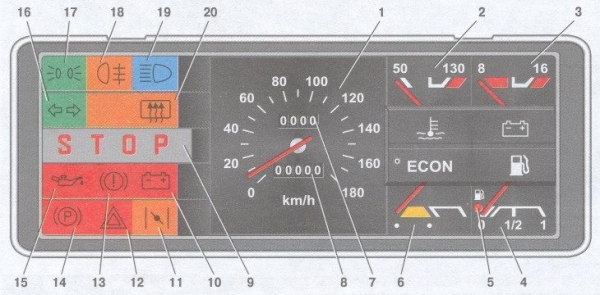
According to the image presented, the components at the instrument combination are as follows.
|
room |
What is it |
|
Speedometer |
|
|
Cooling fluid temperature pointer |
|
|
Voltmeter |
|
|
Fuel pointer in the tank |
|
|
Fuel Reserve Control Lamp |
|
|
Econometer |
|
|
Car daily mileage |
|
|
Total car mileage counter |
|
|
Recharge Battery Charge Control Lamp |
|
|
Control lamp air damper |
|
|
Control lamp activation accidents |
|
|
Low Brake Liquid Control Lamp |
|
|
Manual brake activation control lamp |
|
|
Control lamp emergency oil oil pressure |
|
|
Control lamp turning on rotary pointers |
|
|
Performance Optics Inclusion Lamp |
|
|
Reverse Fog Optics Turning Lamp |
|
|
Far Light Inspection Lamp |
|
|
Rear heating light control lamp |
Dismantling
The reasons for dismantling the low panel of VAZ 2109 may be several:
- Body repair;
- Repair of components of the panel;
- Noise insulation of the car;
- The desire to change the old torpedo to the new, etc.
Regardless of the reasons that forced you to remove your own panel with your own hands, it should be done strictly according to the instructions.
We offer you a step-by-step guide that will allow you without help to remove the low panel type installed on the VAZ 2109.
- Remove the stove control knobs. A total of three.
- Remove the stove fan switch knob. To do this, it must be drawn over.
- Unscrew the console on the 2 fasteners of the dashboard overlay. The lining must be shifted by yourself.
- Turn off the block with wiring from the rear fog optics switch.
- Disconnect a pair of power pads and one feed wire from the rear window heating switch.
- Disconnect the block with wiring from the emergency switch.
- Remove the block with wiring from the outer light switch.
- Turn off the feeding lighter feeding pad.
- Turn off the block with the cigarette lighter wiring and remove the panel lining.
- Remove the 4 fasteners of the stove control panel.
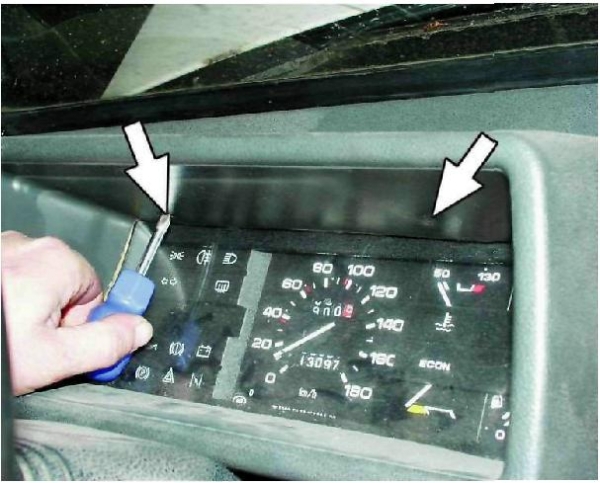
- Unscrew the 2 fasteners of the visor to the instrument panel.
- Remove the visor itself to the visor itself.
- Spring clamps must be compressed.
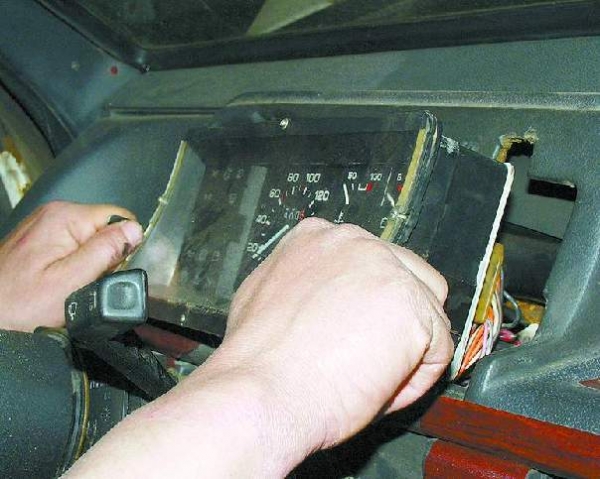
- Remove the body combination body from the panel.
- Unscrew the speedometer fastening nut, then disconnect its cable.
- Disconnect the shoe with wires (it is white) from the instrument panel.
- Remove the hose from the econometer fitting, then remove the pin.
- Disconnect the cable from the speedometer, which resets the testimony of the mileage counter per day.
- From a combination of devices now it is necessary to disconnect the red block.
- Remove the instrument shield lighting knob and headlight gauge handle. They need to be pulled out.
- Unscrew the device backlight mounting nut.
- Unscrew the headlights of the headlights of the headlight gauge.
- Remove the steering wheel and its steering wheel switches.
- Insert the key to the ignition lock, turn it to position 1. So you turn off the anti-theft device. Only after that you can turn off the ignition lock feed pad.
- Unscrew 2 mounting bolts and 2 nuts steering tubes.
- Remove this pipe by grabcing the ignition lock with it.
- Pull the air damper handle (we are talking about the sump of the carburetor). Must appear traction. After that, the handle is removed from the thrust.
- Unscrew 2 fasteners of the air damper guide, hold it on the instrument panel.
- Unscrew the fastening screw on the side of the left dashboard.
- Unscrew fasteners of the bottom fixation of the panel on the left.
- Similarly, remove the fastening on the side and from the bottom on the right side of the dashboard.
- Unscrew the fastening screw of the panel, which is located inside the glove box.
- On both sides of the panel remains one mounting, which should be unscrewed to remove the tidy.
The low panel is assembled in the reverse order, if it is not planned to replace it with a more modern or with a modified design. Then the assembly depends specifically from the panel you chose for your VAZ 2109.
Do not forget that the assembly is not more difficult and not easier to dismantle work. Therefore, you should not relax, after fulfilling half of the case.


