Perform the repair of the generator by car VAZ 2110 with your own hands is quite real. You can both partially repaired the element and completely replace. It all depends on the specific situation and the degree of wear of the device.
According to the operating manual, the planned validation of the state of the generator should be carried out every 50,000 mileage kilometers. But this is provided that the device works properly.
Check
It happens that the generator begins to "climb" before the deadline, does not charge the battery properly. Actually, it serves to ensure the operation of the electricity source for the nutrition of all auto batteries.
Search for breakdown
First define whether your generator acts as a source of problems. To check, you need to hold a number of consecutive events.
- Get the engine and give it to warm up to the operating temperature.
- Increase the crankshaft turnover of about 3 thousand revolutions per minute.
- Turn on all the headlights, activate the range light, run the stove, the emergency, heated glass, wiper brushes. That is, you should include maximum electricity consumers.
- Measure the voltage on the battery.
- If the instrument shows less than 13V, then in the windings of the generator with a high probability, a closure occurred or a break.
- Another option is a voltage regulator breakdown, excitation winding ring contacts.
Check for cliffs and states of other elements of the generator can only be disassembled. But if you do not have any experience in the disassembly of the generator, then you should not try to climb there with your own hands. Replace the node assembly completely or trust the repair of professionals.
Dismantling
To disassemble, remove and repair, or replace the generator, you will need to do the following.
- Singful to a viewing pit or an overpass to have access to the bottom and incapractor space.
- Remove the battery, otherwise it will not allow you to get to the nut, which holds the desired generator.
- Next is the same nut and regular regulation. Here you will need a key of 17 millimeters. Use the extension. This will facilitate the task, you will have to apply a smaller force to unscrew the fastener.
- In the pumpapot space, remove the shield that performs dirt-proof functions.
- Now the drive belt is removed, and the wires are turned off.
- Be sure to remove the protective cap and 10 millimeters key to unscrew the nut that holds the tip and the positive wire of your battery.
- On the locking bracket there is another nut, which will also have to unscrew.
- All, you can remove the generator. Just do not forget to pre-pull a long bolt.
- When removing, follow the buffer sleeve. It will not be good if you lose it.

This procedure for extracting the generator is completed. You can proceed to partial repair or full replacement of the node.
Often, to solve a problem with a poorly functioning generator, it is sufficient to simply adjust the belt.
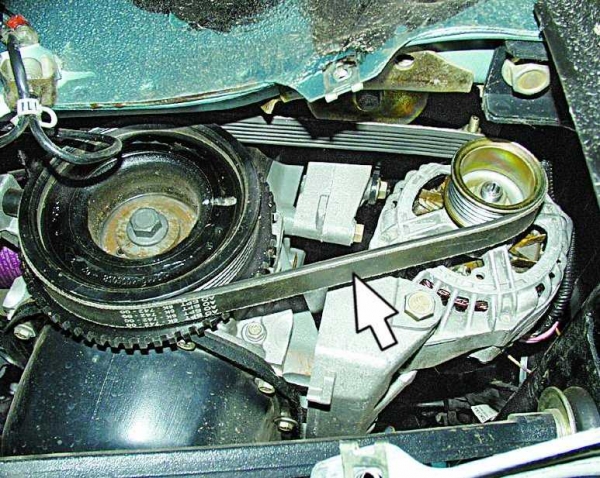
- To work efficiently, it is necessary to ensure normal belt deflection;
- The size of the deflection should be 6-10 millimeters at an effort 98 H or 10 kgf;
- To adjust or replacing the belt, it is necessary to move the generator slightly to the side, in the direction to the cylinder block;
- Rotating the adjusting bolt, you can thus adjust the belt tension.
If this event did not help, you will have to pay attention to the voltage and brush regulator.
Brushes and regulator
Perform repair of the generator brushes, as well as the voltage regulator in the case of their wear, is not recommended.
Experienced specialists advise to purchase a node assembly, which includes both elements. Replacement is performed in a matter of minutes.
But we will definitely tell you how you can change the brushes on the generator of your car.
- Disconnect the minus terminal from the battery and remove the battery.
- Remove the generator by acting according to the above instruction.
- You can replace brushes without removing the generator, but it causes certain difficulties. It is much easier to remove the aggregate.
- Remove the lid, which is a protective casing of the generator.
- The wires and the generator itself are disconnected from the brushes. For this, it is enough just to unscrew a couple of bolts.
- On the right of the dismantled device there is a nut, which is unscrewed by a cape key of 13 millimeters.
- Now lift the voltage regulator lever, which will allow you to get to brushes.
- Using new brushes, install them in place older and assemble the node in the reverse order.
With reverse assembly, act as accurately as possible so as not to damage the repaired generator in your own hands.
Quite often, the cause of the failure is not the generator itself, but its relay.
The reasons for replacing the relay can be several.
|
Cause |
Features |
|
Wear brushes |
The most common cause. This is due to the fact that when brushed brushes, contact with the relay disappears, because the generator receives not enough food, the refusal of work begins |
|
Appears breakdown in the scheme |
As a result, the voltage in the system is growing, the device fails |
|
There is a rupture of wires |
Contact loses the initial clutch quality |
|
Farming of fasteners or housing |
It is better not to bring the situation to this, otherwise there will be a short circuit, and there is not far from the exit of all devices in order |
When signs of a malfunction of the generator relay, be sure to immediately replace it.
Relay checking
Many inexperienced or ignorance believe that when the battery cannot hold a charge, the culprit is exclusively the generator. But in practice, the relay regulator is not rarely caused. To check it, you need to perform several operations:
- Raise your car hood.
- Get the engine and turn on the second, and even better the third gear.
- Remove the minus terminal from your battery. So you will be able to avoid short circuit.
- If, after disconnecting the terminal, the engine continues to work, the relay failed.
- If the car turned off, then the problem should be sought in the regulator itself.
Three-level relay
Many experts advise three-level relays on VAZ 2110.
The relay regulator is installed on board the car, and the generator panel and brushes are directly in the generator.
Three levels of the regulator allow the battery for a long time to remain charged, plus its service life is noticeably extended.
These three levels are as follows:
- Minimum. It is required to ensure the work of the car, even in conditions of elevated, extreme temperatures. The engine will not stall during the trip along the hot plots, it will be able to withstand the load at indoor slopes. Such a level is relevant for the summer season;
- Norm. The second level, which provides normal operation under standard conditions without increased loads;
- Maximum. It allows you to confidently operate the car under conditions of negative temperatures, makes it possible to start a motor with a discharged battery.
Buying such a relay regulator will ensure reliable operation of the battery and the entire car. Therefore, it is not necessary to refuse this acquisition.
Relay replacement
To replace the relay you will need:
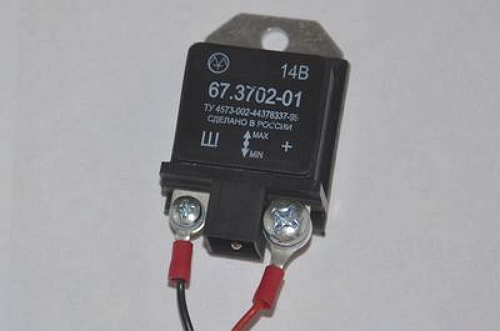
- Find an item. On VAZ 2110 cars, the relay is usually black and the element is fixed directly on the generator with a yellow wire.
- Disable the minus terminal from the battery.
- Disassemble the two fastening bolts of the generator.
- Remove the wire of yellow, which goes from the generator on the relay.
- Remove the relay, study its condition, check the level of wear of the brushes and, if necessary, replace both items.
- If the brushes are intact and the relay, too, the problem may wage in the break or the formation of the blasts on the wiring. Replace wire or draw them.
- Check out the operation of the new voltage controller, connect it to the generator and return the yellow wire into place.
- Turn on the battery and check the help of the node.
Do not try to save on a replacement relay by some handmail repairs. The new relyushka costs no more than 100 rubles, but the integrity of a large number of equipment installed on the VAZ 2110 depends on its proper operation.
Rotor bearings
On the generator there are two bearings, the repair of each of which has its own nuances.
- The first bearing is roles on the front cover. Disassemble it with your own hands is not possible. Because the only solution is to purchase a new lid along with the bearing and replace the node.
- The second bearing, it is the tail, located on the Rotor shaft. Demonstrated by this bearing by the puller. To install a new item, you will need to use the press.
Practice shows that the most optimal option for repairing the generator is its complete replacement. Repair will give a certain result, but only for a while. All items are interconnected, because when a breakdown of one can begin a fault chain.


