Replacing a generator on a car is a common procedure. The generator is not cheap and therefore some drivers have learned to repair it on their own.
In principle, there is nothing complicated in this. Moreover, if you use the step-by-step instructions described below.
How to repair a generator yourself?
A car generator is an important mechanism. A lot depends on him, and without his normal work, you won't go far. Malfunctions of the generator on the machine are usually associated with malfunctions of the battery.
Repair of the VAZ 2106 generator is inevitable in these cases. It can be complete or partial, and it all depends on the cause of the failures.
Most often they are associated with a tension belt or bearings.
Drive belt and check its tension
Start checking the generator with the drive belts, or rather, its sufficient tension. Belt tension is essential for proper generator operation.
We can confidently say that the operation of the water pump and even the bearing of the crankshaft itself depends on a correctly tensioned belt. Loosening the strap will not generate enough electricity for the battery to function properly.
If its tension is too strong, the generator itself often breaks down. It is recommended to change the belt for every 15 t. Kilometers. Well, when cracks, tears or delamination are noticed on it, then even more so.
So, let's start checking.
For this:
- we drown the car ( it is advisable that he stood on the pit, since it is more convenient to work with the belt under the machine);
- we raise the car on a jack, if it is not put on a pit;
- remove the protective crankcase;
- we squeeze the belt with our hand up in the center between the pulleys of the generator and the crankshaft (we do not press hard);
- we measure the amount of deflection using a ruler (it should be no more than 10-15 mm).
![]()
Adjustment
The discrepancy between the deflection value and the required figures forces the tensioning belt to be adjusted.
Adjusting the VAZ 2106 belt, the repair of the generator of which directly depends on this, implies the following:
- diverting the generator from the cylinder block;
- turning the bolt clockwise (two full turns are enough);
![]()
- checking the belt tension (if the belt is too tight, then you need to turn the bolt counterclockwise);
- securing the generator in place.
The VAZ 2106 generator, the repair of which is associated with a tension belt, implies a competent approach to business. Indeed, with high tension, increased loads on the bearings of the generator itself and the tension roller are possible, as a result of which they will quickly fail.
With a weak belt tension, it will constantly slip on the pulleys, which will directly affect the operation of the battery.
Replacing the tension belt
In cases where the belt cannot be adjusted, it is replaced.
And for this, actions of the following kind are carried out:
- the bolts on the upper and lower mounting of the generator are loosened (the adjusting bolt is also unscrewed by half);
- the generator is moved as close to the cylinders as possible;
- the belt is removed from the generator pulley and crankshaft;
- a new belt is first put on the crankshaft pulley and then on the alternator pulley (in case of difficulty, it is recommended to turn the crankshaft slowly until the belt is put on);
- check belt tension.
Generator replacement and repair
Often times, the cause of a generator failure is within the generator. To do this, the generator must be removed and disassembled.
So, we carry out the following actions:
- remove the generator;
- mark a longitudinal mark on it with a felt-tip pen (it will come in handy during assembly);
- we manually wring out the latches on the top cover (there are three of them);
- remove the cover;
- unscrew the two screws securing the voltage regulator;
- disconnect the wire from the regulator terminal;
- unscrew the screw securing the capacitor;
- we unscrew the screws fixing the block itself (there should be four of them);
- we take away three wires with terminals in order to remove the rectifier unit;
- unscrew the contact bolt nut from the rectifier unit;
- remove the washer with a spacer fork;
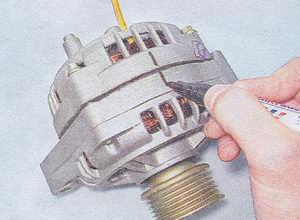
- we change the capacitor;
- remove the tip of the capacitor wire from the contact bolt;
- we unscrew the four screws holding the flat and spring washers (they are clamped very tightly, therefore it is recommended to use an extension wrench);
- pry off the generator cover from the side of the slip rings with a screwdriver;
- we clamp the generator rotor in a vice and unscrew the nut that secures the pulley;
- remove the pulley itself and the spring washer;
- remove the thrust washer;

- This video will help you understand the details.
- there is a rotor on the drive side, which must be removed;
- we take out the spacer ring from the rotor shaft;
- we check the slip rings and if they have scuffs, cracks and similar defects, it is required to grind them with fine sandpaper (often this is done on a lathe, followed by processing with sandpaper);
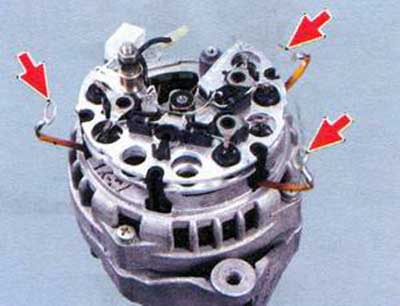
- using an ohmmeter, we check the resistance of the rotor winding by connecting wires to the slip rings (if the tester shows an infinite value, then there is an open circuit and the rotor should be replaced);
- we check with a control lamp the presence of a short circuit in the winding of the rotor body (the photo below shows how to do this);
- proceed to inspect the stator;
- we examine it carefully, trying to find traces of the armature rubbing (if similar symptoms are observed, the bearings are replaced or the general generator cover together with the bearings);
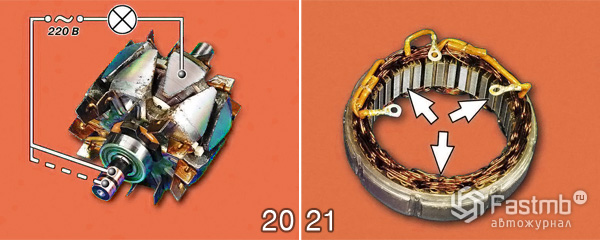
- we check the stator winding with an ohmmeter for an open circuit (for this we connect the test lamp to the output of the stator winding, and the wire from the current source to the body - if the lamp lights up, then the winding or the entire stator needs to be replaced);
- Do-it-yourself repair of the generator also implies an inspection of the generator cover from the drive side (if you feel a backlash during the rotation of the bearing or jamming, or there are traces of grease leakage, or cracks are found in the attachment points, then it is necessary to replace the cover along with the bearings);
- it is also necessary to check the free rotation of the bearing (if there is a play between the rings or jamming, the bearing is replaced);
- we check the generator cover from the side of the slip rings (if serious defects are found, it is replaced with a new one);
- we collect everything in the reverse order, as the instructions indicate (it is necessary to close the cover, on which the line is marked with a marker, and put the pulley spring washer with the convex side to the nut).
This completes the repair of the VAZ 2106 car generator. It is only necessary to highlight a few points. When tightening the last spring washer, a torque of 39-62 Nm can be used.
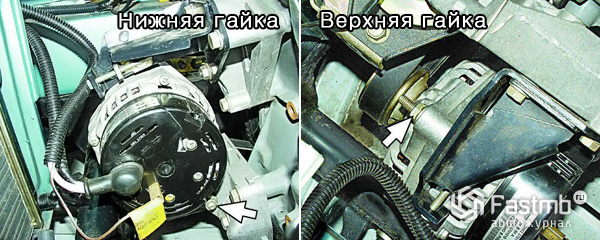
To make it easier to work with the generator mounting nuts, the battery must be removed. For the convenience of unscrewing the nuts, it is advisable to use a head with a cardan joint and an extension.
When working with the generator, it is recommended to use keys for 10, 17 and 19. It is advisable to remove the generator in the inspection pit or after lifting the car on a jack. That's all there is to it!
The step-by-step instructions given above will help many motorists save good money, because the price of a new generator is quite high today.


