In the rules of the road, it is said that the car should not go if the overall and head lamps are not lit in the headlight headlights in the night and evening (when dark) or if the visibility is insufficient. For this reason, the replacement of lamps in the back lamp VAZ 2110 is an important thing.
Replacing the rear lamp lamps VAZ 2110, a faulty head light bulb in a block-lamp, as well as a combined light bulb of the dimensions and a braking signal can be carried out independently without special difficulties.
Replacing the lamp of the head light - how it is carried out
To change the headlight lamp in the headlamp, you need to perform actions in a specific sequence:
- remove the battery;
- keeping the lamp behind the lamp, separate the wires in the block directly from the lamp;
- remove the rubber case;
- retire the end of the retainer of the spring with the hook from the engagement, move the wilk lock;
- take out the light bulb from the block headlights;
- put a new lamp by producing a reverse sequence of actions.
Note. If the lamp of the overall light in the block phary turned out to be faulty, its replacement occurs in place. Otherwise, you need to go there, where it will be repaired with a light light with a lamp.
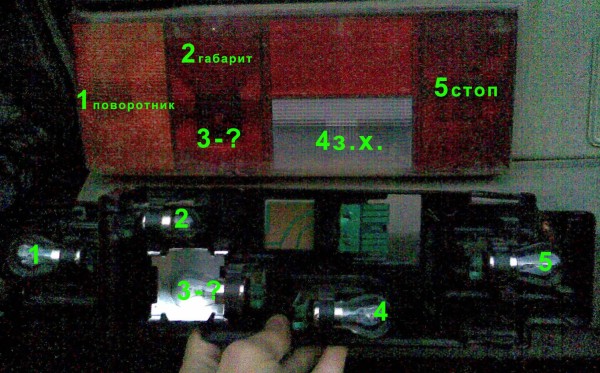
Rear Light Design VAZ 2110
The rear lamp of the car consists of the following sections:
- fog light (red light diffuser);
- rear light (white light diffuser);
- running pointer (orange light diffuser);
- overall light and braking signal (red light diffuser);
- light factory (dirty).
Causes of malfunction
The reasons for which the lighting does not work may be somewhat. Each fault requires an individual approach and implies its ways to troubleshoot.
Causes of malfunction and methods of elimination (if some lamps of lamps and headlights do not work):
- burnt fuses - replace them (see);
- blocked the filaments of lamps - change the lamps;
- contacts were oxidized on relays or switches - perform their stripping;
- the wires were damaged, their tips or conjunction loosen were oxked - to replace the failed wires, clean the tips;
- the jumpers of contacts were oxidized at the location of the lamp control relay - to clean them.
Sometimes the diffuser block headlights strongly.
What are the reasons and what to do in this case:
- a leaky bonding of the scatterer with the case - immerse the block headlight into the water, in the case of fluid penetration, replace the headlight;
- moore falls in the direction of the car in the process of washing the car - to eliminate the liquid from the block headlight.
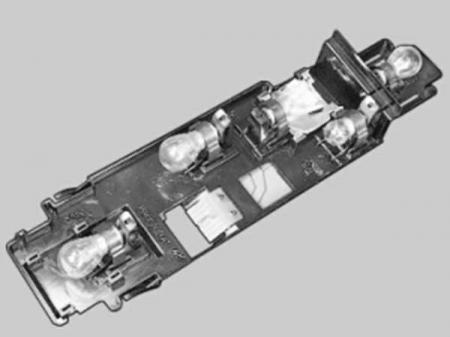
Replacing the rear light and its elements
Replacing the rear light occurs according to the scheme:
- out from the terminal "minus" battery wire;
- opening the trunk lid, unscrew the screws that the back upholstery of the trunk is attached (2 pcs);
- by pressing the back upholstery, bend the side upholstery, which will allow access to the details of the rear light connection;
- disconnect the lamp and the block with wires;
- surround the nuts that hold the rear lamp and remove the washers;
- remove the lantern from the car;
- release the lamp body from the holder and lamps, compressing the paws of the retainer;
- install a new flashlight by performing actions in reverse order;
- skip the side upholstery under the seal.
Note. When installing, it is necessary to notice that the side screws are longer screws, which are fixed by the rear upholstery of the trunk.
Replacing the lamps of the grocery and rear lights
Changing the lamp of the dimensions of the car, it is necessary to make the following actions:
- remove the lamp from the optical element together with the cartridge;
- remove the lamp from the cartridge.
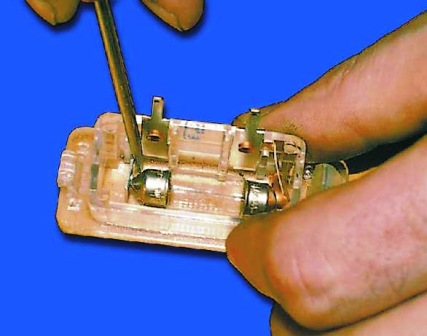
Replacing the light bulbs in the rear lights are made according to the following algorithm:
- lamps should be changed from the luggage compartment;
- remove the contact part along with the lamps (it is held in the lantern housing using latches).
Note. Do not touch the glass surface of the halogen lamp with your fingers.
When heated, the traces will cause darkening. You can wipe the lamp with a cloth or gauze impregnated with alcohol.
Side indicators turn
In the event of a malfunction of the lighting of the side indicators of rotation, you need to do the following:
- shift the side pointer to forward, pulling it out of the back;
- remove the above detail;
- disconnect the cartridge with the lamp;
- replace the lamp by shifting the case;
- if you need to replace the cartridge, you need to disconnect the wires.
Light bulb room car
If the lights are not burning, which illuminates the car number, the actions should be such:
- replete two self-pressing cruciform screwdriver and remove the ceiling;
- replace the lamp, previously removing the transparent lid on top.
Stop signal and reverse
Remove and install the flashlight of the stop signal and the reverse light can be used according to the following scheme:
- remove the lantern board, compressing the protrusions;
- remove the lamp by pressing down and turn counterclockwise;
- disconnect the wiring connector;
- unscrew nuts (two extreme and two medium) decorative lining using the appropriate size tool;
- remove the lining;
- unscrew the two nuts that are fixed with a lamp and remove it.
Note. The assembly occurs in the reverse order.
Light bulb of fog
For high-quality replacement of the light source in, it is not required to remove it.
So:
- disconnect the minus wire (its terminal) from the output of the battery;
- remove the rubber protective cap from the zizard on the reverse side of the reflector;
- remove the tip of the "minus" wire with the output reflector;
- take the bracket for fastening the lamp in the form of a spring, compressing it with your fingers;
- bring the lamp from the hole, which is in the reflector;
- disconnect the "Plus" wire tip from the wire lamp.
You can collect the lamp by observing the opposite procedure.
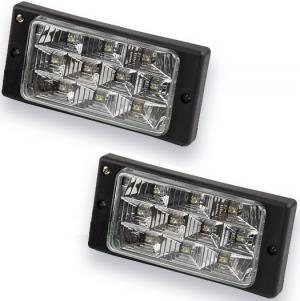
Replacement of the entire fog light
If you want to replace the entire fog light, the actions are:
- disconnect the block of its wires from the harness;
- unscrew the two screws for fastening the cross-like screwdriver;
- remove cladding;
- remove the fair;
- install the new headlight in the reverse order.
Other malfunctions affecting the illumination of the rear lights
The reverse lights may not be lit due to the failure of the switch.
To troubleshoot problems, you need to perform the following:
- disconnect the connector;
- unscrew the key switch "to 21";
- remove the switch and replace it with a new one.
Note. The operation should be carried out quickly so that there is no big leakage from the machine oil gearbox.
Fault lights of the machine can be caused by malfunctions in the hydrocormer. With it, you can change the angle under which the headlights are tilted (this is due to different levels of the car load).
The hydrocorrector from the main cylinder, which is attached to the dashboard, executive cylinders of block headlights and tubes of the connection. It does not understand and cannot be repaired.
It should be replaced by the details assembly.
The removal and installation of the main cylinder of the hydrocorographic headlamps occurs in stages:
- remove the handle and the cylinder lining, going on it with a screwdriver;
- unscrew the nut "on 22" head;
- remove the hydrocormer.
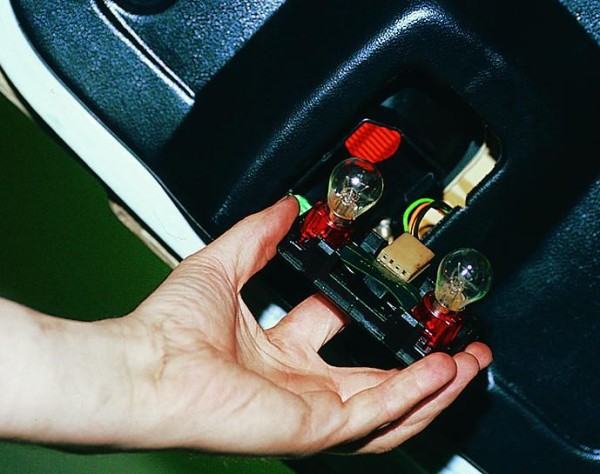
The lantern on the trunk may also require replacement.
In this case, you need:
- the wire and terminal of the minus battery disconnect;
- disconnect the rear lamp from the pad with the wires by opening the trunk lid;
- press the lock details and remove the holder with the lamps from the Lantern Case;
- discover the lantern by unscrewing two nuts;
- weaken the three nuts that are fixed with a decorative luggage cover and unscrew the nut closest to the lantern;
- lift the lining and remove the lantern;
- a new flashlight is installed in the exact order described above.
Note. When installing a flashlight, the flange of its body under the decorative lining will be started, and after the ward fastening nuts are tightened.
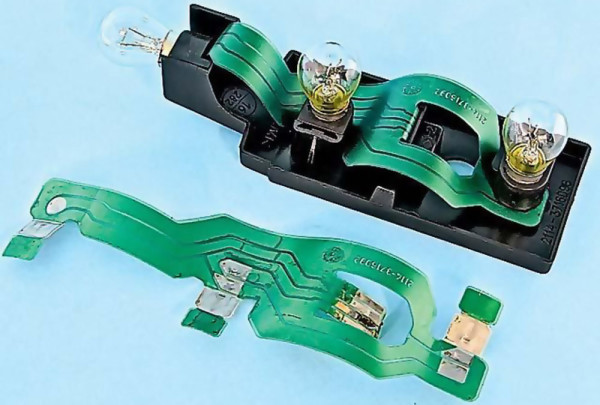
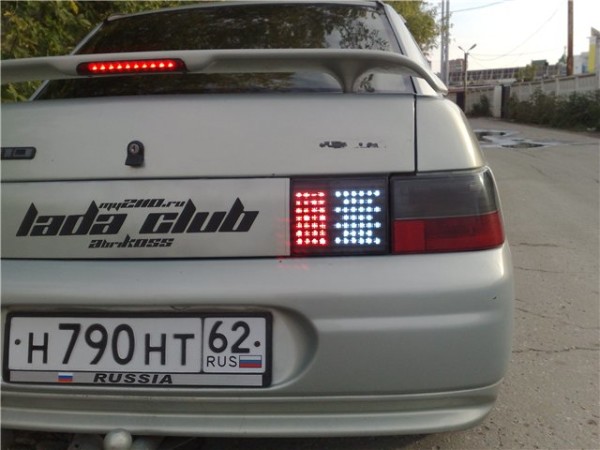
Many cars of the VAZ family, including VAZ 2110, there is a problem that affects safety, as well as delivering a lot of trouble to drivers. The rear light board is a thin ribbon with conductive paths.
It is necessary to change this tape quite often, and with it and burned light bulbs. You can use an option for inserting iron cartridges from VAZ 2101.
So, to carry out this, it is necessary:
- remove and disassemble the taillights by drowing the board and the tape itself;
- buy single cartridges for stops and dimensions;
- purchase copper wire with a cross section 2, 5 mm, connectors, bolts M3;
- mark the places for the cartridges and drill them, finishing the hole with the file;
- to improve the cartridges for the dimensions and stop signals, the conclusions of the tips rotate 180 degrees;
- cartridges from the turn signals to reveal at all;
- fasten the cartridges to the plastic bolts with nuts;
- connect all the cartridges by paving the advantages on the turns, feet and dimensions;
- raisse the block of the connector and install everything on the car.
Note. Before installing, you should check everything so that there is no closure.
LED lamps - what they are better
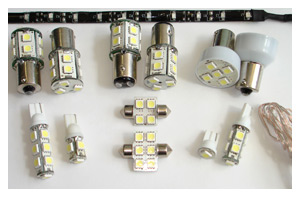
Many foreign cars in our time are equipped with LED lamps instead of all familiar incandescent bulbs. Such lamps are installed in the rear lights as stop signals, overall lights, direction indicators.
This is not by chance. Such a light gives the driver who is behind, extra time for making a decision and for maneuver.
Advantages of LED Lamps:
- service life longer, light output is higher;
- the LED flares up many times faster than a regular lamp. This is an additional 5-6 m at a speed of 100 km / h.
- incandescent lamps are faced earlier than most often due to severe vibration, especially considering the quality of Russian roads. The LEDs according to this indicator are much more durable, the vibration is not terrible for them.
Note.
If you change the incandescent lamps on LED lamps in dimensions and stop signals when the control system is enabled, it will show the incineration of the incandescent lamps due to the smaller current in these circuits. In order for the system to be aligned, you need to finalize the relays that are monitored by the function of lamps.
Here is a video review that will be useful to see. It shows the operation of LED bulbs behind.
Thus, their constituents will not be much labor. All that is needed for this is to clearly follow the photo instructions.
It can be significantly saved on the repair of the car, if the expected work will be performed by the car owner itself with your own hands.
It is necessary to remember the rules that must be observed, resorting to independent performance:
- carefully diagnose;
- perform tips and repair recommendations;
- use high-quality factory production details;
- check the operation of the machine systems after repair.
Note.
Do not take for certain actions if the driver feels insecurity in his abilities. In this case, it is better to resort to the services of a specialist, although for the services of this kind, he will take no little money.
But there will be no problems if you do everything as the instruction advises. Today in stores the price of the rear light bulbs, like the headlight itself is not so expensive.
So try to replace yourself independently.


