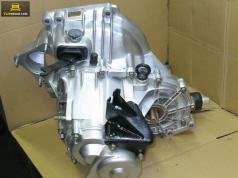
To ensure the optimal operation of the engine when driving a VAZ car in different conditions, a gearbox is used. The device changes the torque transmitted to the drive wheels of the car from the engine when starting off and accelerating.
The gearbox enables the car to move in reverse, disconnects the drive wheels and the engine for a long time, which is necessary when the engine is parked and the engine is idling while driving.
On VAZ cars, mechanical stepped gearboxes are used with toothed gears, with four or five gears, excluding reverse gear.
Gear shifting is performed by moving the gears of the unit. They alternately engage with the rest of the gears or are locked on the shaft by synchronizers that equalize the speed of the gears involved in the operation and one of them is locked with the driven shaft.
The reliability of the unit is ensured by the timely repair of the VAZ 2114 gearbox.
The reasons why the presence of faults in the node is determined:
- Heating elements.
- Increased noise when the engine is running.
- No gear shifting.
- The transfer is "knocked out" on the go.
What are the malfunctions of the KP auto VAZ and methods for their elimination
For a VAZ 2114 auto gearbox, repair is required in the cases shown in the table.
Here are the ways to eliminate them:
| Noise in the control panel | |
| Cause of breakdowns | How are they eliminated |
| Bearing began to make noise | Defective bearing changes |
| Gear teeth and synchronizers worn out | Worn out parts are replaced |
| Low oil level in gearbox | Oil is topped up. The causes of leaks are eliminated |
| Axial movement of the shafts has occurred | The elements of the locating bearings, or bearings are changed |
| Transmissions do not turn on clearly or spontaneously | |
| Balls or rod seats are worn out, the elasticity of the retainer springs is lost | New parts are being installed |
| Synchronizer locking rings worn out | Locking rings change |
| The synchronizer springs are broken | New springs are installed |
| The teeth of the synchronizer clutch or the rim with the teeth of the synchronizer itself are worn out | The clutch or gear is changing |
| Oil leaks | |
| Shaft oil seals are worn out - primary and secondary | New oil seals are installed |
| The fixation of the gearbox housing covers is loosened, the gaskets are damaged | Nuts are tightened or gaskets are changed |
| The fastening of the clutch housing and gearbox is loose | The nuts are tightened |
How to remove a gearbox from a VAZ car
On a VAZ 2105 car, gearbox repair begins with removing the unit from the car.
For this:
- The car is placed on the inspection pit.
- The hood is secured against accidental closing.
- Disconnected: battery, TDC sensor, traction starter relay.
- Earth is disconnected from the crankcase.
- The clutch housing and TDC sensor are disconnected from each other.
- The speedometer is disconnected (see).
- The clutch release fork is disengaged.
- A bracket is installed for lifting to the stud securing the exhaust manifold of the engine.
- The motor is suspended on a lifting device.
- The cover installed below the clutch housing and the engine mudguard are removed.
- Oil is drained from the gearbox.
- The reverse light is switched off.
- It is detached from the rod to select gears, its thrust.
- The gearbox and engine are decoupled.
- The axle shafts of the hub on the steering knuckle are disconnected from the mount.
- The ball joints on the suspension arms are detached from the knuckles.
- The shafts of the wheel drives are retracted to the sides.
Tip: To facilitate the separation of the pinion shafts and the wheel drive, it is necessary to remove the wheel drive together with the gearbox, and then press out the hinge on the bench plate.
- The gearbox is removed from the studs, the suspension bracket is removed, which is located in the side member lugs on the machine body.
- The starter is pulled out.
- The gearbox shaft and the driven one are separated.
- The gearbox is removed.
Tip: When a VAZ 2115 gearbox is being repaired, it is necessary to carefully handle the petals, which are located on the pressure spring. It is impossible for the input shaft to rest on them so that the parts are not damaged.
How to disassemble KP VAZ 2112
Repair of the VAZ 21213 gearbox begins after cleaning the unit from dirt and thoroughly washing the outside.
Further, the manual for the maintenance and repair of the gearbox offers:
- Place the transmission in a vertical position.
- The nuts holding the back cover of the assembly are unscrewed.
- The clutch cable bracket is disconnected.
- The rear cover is detached from the gearbox housing. To do this, you need to use a rubber mallet.
- The sealing gasket is removed.
Tip: It is better to remove the gasket carefully. If, after inspection, there is no defect on it, the part can be installed in place.
- The third, possibly the fourth, gear is included on the car.
- The bolt holding the fifth gear plug is unscrewed, after which it turns off. The synchroniser sleeve together with the fork moves downward so that the splines of the sleeve and the pinion mesh.
- Make sure that the shafts do not turn.
- Nuts are loosened on both gearbox shafts.
- The synchronizer for fifth gear is pry off with a screwdriver and, together with the fork, is removed from the gearbox.
- The fork is pulled out of the clutch.
Tip: The synchronizer must be removed carefully so that the clutch does not come off the hub. This can lead to loss of spring loaded balls.
- Removed from the synchronizer, blocking the fifth gear, ring.
- The driven gear for the fifth gear is pry off with a screwdriver and removed from the output shaft.
- The thrust washer is pulled out of the needle bearing.
- The needle bearing is removed.
- On the input shaft, the drive gear for the fifth gear is removed.
- It is released from the fixing, and then the bearing plate is removed.
- The thrust washer and needle bearing sleeve are removed from the output shaft for fifth gear.
- Retaining rings are removed from the shaft bearings.
- The stopper plug is turned out.
- The retainer spring and balls are gently pulled out.
- Release the fasteners and remove the rear engine mount.
- The stopper plug for reverse is unscrewed. The retainer ball and the spring are pulled out of the gearbox, which must first be tilted.
- The attachment to the clutch housing is removed the gearbox housing.
- Use a large screwdriver to separate the clutch housing and.
Tip: The screwdriver must be inserted into the special grooves, and then wiggled to separate the nodes. This will allow the gasket to be released without damage.
- The gearbox housing is removed.
- The fork is released from the fixation with the help of which the first two gears are switched, the rod is lifted and then pulled out of the unit simultaneously with the fork.
- The shift fork of the fourth and third gears is released from fixation.
- The connecting rod head is disengaged, the fork and rod are removed at the same time.
- The stem head for the fifth gear is removed from the lever, rotated and pulled out.
- The retaining ring is pulled out.
- The fork and the reverse gear axle are removed.

- The primary and secondary shafts are removed. In this case, they need to be slightly wiggled.

- The differential and the driven gear of the main drive are pulled out.
- The mount is removed and the gear shift assembly is removed.
- The sealing gasket is removed.
- The front bearing is pressed from the secondary shaft from the clutch housing, as seen in the photo.

Tip: When replacing the input shaft bearing, the oil seal must be replaced.
- The magnet is pulled out of the clutch housing.
- After releasing from the fasteners, the speedometer drive housing is removed from the gearbox driven gear.
- The sealing rubber ring is changed, if necessary.
- The driven gear with the shaft and the O-ring are removed from the speedometer drive housing.
- The reversing light switch is turned out of the gearbox housing.
- The cover is shifted from the flange to the gearbox. The part is designed to protect the gearshift rod and the hinge flange.
- The hinge is removed from the gear shift rod.
- The protective cover is removed.
- The fixation of the lever and the rod is removed, which are then pulled out of the clutch housing.
- The oil seal is changed if traces of oil leakage are found on the clutch housing.
How to inspect and draw up a defective statement on the CP
On a VAZ 2115 car, the gearbox is repaired after drawing up a defective statement.
For this:
- The rear cover and the gearbox clutch housings are carefully inspected. The parts should not have chips or cracks.
There were no risks, dents or nicks on the mating surfaces. Small damages are removed with a sandpaper.
If there are large defects, the parts must be replaced. - The seats in both crankcases are checked for bearings. They are not allowed to show signs of wear.
- The rods used for gear shifting are checked. Replacing them is needed in case of burrs, working out places for installing clamps, the presence of curvature.
- Severely worn gear shift forks require replacement.
- Worn bearings (see), gaskets are subject to replacement.
- The magnet must be cleaned of wear particles. Cracks, weakening of magnetic properties are not allowed.
- The sealing surfaces of the clutch housing, gearbox and rear cover must be cleaned of old sealant.
How to assemble a gearbox
After the gearbox has been repaired on a VAZ 2112 car, it can be assembled.
The assembly of the assembly is made back to its disassembly, taking into account some recommendations:
- Before installing the secondary and primary shafts in the crankcase, the teeth of the gears must be meshed.
- The forks are installed on the gear shift rods in the following sequence:
- a fork for fifth gear is installed on the first rod;
- on the second rod, the fork of the third and fourth gears;
- in the third place the fork of the first and second gears.
Tip: On a VAZ 21213 car, the gearbox is repaired with abundant lubrication of all rubbing parts with gear oil.
- The magnet is put in place.
- Sealant is applied to the plane around the entire perimeter of the gearbox clutch housing. It is also applied when installing the back cover.
If a new VAZ 2115 gearbox is installed, it needs to be repaired if factory defects are found.
How to repair a VAZ 2105 gearbox can be seen in the video. The VAZ 2101 gearbox has a similar design. Its repair is carried out according to the same principle.


