In previous articles, explained how you can remove the engine with the VAZ 2109 without removing the gearbox and disassemble at home. Now I will explain how to collect it.
The engine was versed for repair, the cause of repair, the engine VAZ 21083 fastened the oil. After the disassembly, it turned out that the oil consumption was due to the large wear of the piston group, the block was rearmed under the pistons of the first repair of 82.4. The crankshaft turned out to be completely new, he was not polished replaced only inserts with new ones. Also, the valve priest and replaced the valve glands, the trigger of the head is described in the check mark of the VAZ-2108 head valves before 15
Engine assembly
The engine begins to collect from the installation of indigenous liners and crankshafts. Now there are inserts in different sets, in the photo inserts are not very good configuration. Since there are no holes on the liner for the crankshaft central neck, and since this neck without a through hole is in the lower liner there will be starvation oil and this leads to a faster wear of the crankshaft crankshaft . Therefore, do not be lazy to drill a pair of holes as shown in the photo below.
Photo. Proper installation of liners in the VAZ 21083 engine block.
Before installing the liners in bed, carefully wipe the bed with a rag so that the liner does not fall, the garbage under the liner can lead to a crankshaft and poor heat pumping of the engine insert. Selects Install immediately as shown in the figure, lubricate the oil inserts, the semiring inside also wake oil then they will not fall out from their places.

Photo. The arrow shows the stubborn semiring engine VAZ 21083
After installing the crankshaft in the block, be sure to check the longitudinal movement of the crankshaft, it can be made with a screwdriver as shown in the photo below, insert it from different sides if there is a change of crankshaft means the repair semiring is needed. Here you can already pick up one repair and the other standard, or slightly to run the semiring on the stone or sandpaper unsettled on a flat surface. Try to achieve that there is no longitudinal movement of the crankshaft if the longitudinal movement will be the semiring can fall out when the engine is running.

Photo. Checking the longitudinal movement of the crankshaft.
Now it is necessary to put crankshaft pillows into place, each pillow must return to its place, from another engine you can not put a pillow as it will be a little different in the gap and can either clamp or give a slack. The photo shows how to properly install the pillow, pay attention to the liner lock put to the lock of another liner, the photo shows the installation of a third pillow with drilled holes. It does not matter beautifully drilled holes or not, it is important that the oil on the neck of the crankshaft will be served.

Photo. The correct installation of the crankshaft pillow.
Immediately put all the crankshaft pillows but do not tighten the bolts. Now, start tightening one pillow, always starting with the third, tightened to push the crankshaft, scroll through it as shown in the photo below. And so after each tightened pillow try to scroll through the crankshaft. It is necessary to delay the pillows well but not to rearrange as you can break the bolts. Read more on the crankshaft in the article Repair of the crankshaft (crankshaft).

Photo. Tightening crankshaft pillows.

Photo. The correct installation of the piston in the block, the arrow shows the liner lock on the connecting rod.
Before installing the piston in the cylinder, the piston rings lubricate the oil and do not forget to lubricate the rod inserts with oil.
![]()
Photo. Installing the piston in a cylinder with the help of a homemade brute whom we wrap one ring, inserted an oil-melted hand inserting the following.
Pistons with connecting rods stand still, put the back cover, but do not forget to replace the old gland new, I do not put the gasket under this cover, we will smell a sealant.

Photo. The back cover of the VAZ 2108 engine.
Before installing the flywheel, type a cleansing groove on the factory label, as the factory label is very thin and it is difficult to find it on the flywheel when it is in the engine.

Photo. Tag on the flywheel VAZ 21083
That's right, the flywheel is put like this, bring the fourth piston to the very top as shown in the photo, the label should be top.

Photo. Properly supplied flywheel on the engine VAZ 21083
Be sure to smear the threads of the bolts to sealants when twisting the flywheel, because in the crankshaft of the Threads, the bolt cannot pass oil into the clutch disk.

Photo. Promoted bolt to sealants when twisting the flywheel.
To be easily and strongly tighten the flywheel, you can use the way shown below in the photo. Block the rod, and tighten the bolts head.

Photo. Flywheel tightening.
After installing the flywheel, you need to correctly put the clutch disc, if you put it on the contrary, the clutch will not work. In the photo below, you see a disc clutch basket, the arrow shows the protruding walker of the clutch disk, it must be logged in to the basket. As the photo is shown in the photo and it is necessary to put, the primary shaft from the classics box is ideal as the mandrel of the clutch disk.

Photo. Proper clutch disk.
Photo. A swirling basket with a centering shaft, after this shaft is pulled out, the shaft gives an accurate center of the clutch disk, without a centering shaft it is very difficult to choose the clutch disc correctly. And this may not give to wear the engine on the box, since the shaft of the box will rest in the clutch disk.

Photo. Shaft in clutch disk.
Now you can put the front cover (Maslonasos) Do not forget to change the gland new, get the oil pump on the crankshaft. Under this cover, I do not put the gasket, I use sealants. Put the knap and gear of the timing belt drive. Screw the front crankshaft pulley.

Photo. Tightening the front pulley crankshaft.
Before installing the oil worker, be sure to delay the tip of the tube to sealants, it will prevent the air supply drum into the oil pump, if this is not done, then the old rubber gasket will be used to train this will lead to poor oil pressure.

Photo. Installation of the oil worker on the engine VAZ 21083
Now you can fasten the oil sensor and pallet.

Photo. Engine before installing the pallet.
It remains to fasten the pump, but in order not to be mistaken how to put it correctly, you can navigate through the hole in the pump, it should look down the engine, the photo shows this hole.

Photo. Motor pump VAZ 21083.

Photo. Engine VAZ 21083 with mounted pump.
Since the engine removed without a head, it means and to put without a head through the bottom, but for the convenience of installation, you can cut as shown in the photo below the piece of fusing from the velocity of the speeds of the speeds.
Installing the engine VAZ 21083

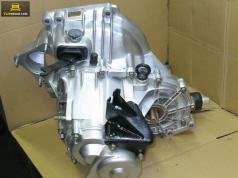
Photo. Bustry box VAZ 21083
You can immediately lubricate the frozen bearing with an oil, preferably a transmission or mixed with a litol, it can be pressed by a syringe through the slot shown in the photo below.

Photo. Sworzor Bearing Engine VAZ 21083.
We put the engine as it was filmed through the bottom without a head, it can be easily done at home together. To do this, skip the belt or rope to the engine, put a thick rag on the front of the machine and with the help of a pipe or a scrap, you can not tighten to pull the engine on the box, as shown in the photo below. Put the box with bolts. Raise the engine, screw the pillow, the engine is set remains to put the head.

Photo. Installing the VAZ 21083 engine through the bottom.
How to assemble the engine VAZ 21083. Video
Gorobinsky S.V.


