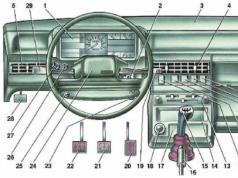
The interior lighting of the car VAZ 2110 has a wide variety of light elements. Most of them are located on the dashboard.
There is a backlight of sensors, instruments and indicators. Do not forget about the individual lighting of the car, the ceiling lamp for lighting the interior of the car and the lampshade, which helps to see the contents of the luggage compartment of the car.
It happens that in the VAZ 2110 the interior lighting does not light up and at any time each of the components can go into a faulty state. Each of these elements of lighting needs to be approached.
Interior lighting and ceiling lamp

The first step is to consider the case of a breakdown of the switch that supplies electricity to. This device allows you to get a direct source of bright light in the car.
Sometimes it needs to be repaired or replaced.
For this task you will need:
Note: It is not necessary to disconnect and remove the battery from the hood to work on the vehicle lighting wiring.
- It is necessary to prepare a Phillips screwdriver in advance. Use it to unscrew the screw that attaches the switch to the rack.

- There is a small hole in the door post that contains this switch. It must be removed from this hole.
There is a wire to which this mechanism is attached. Disconnect with a gentle movement.
Note: a common cause of a short circuit is rust, which occurs at the junction of the screw with the door (pillar) of the car. To complete the assembly process of this mechanism, it is necessary to perform the same steps, but in reverse order.
Trouble can be delivered by a breakdown of the ceiling, which is located in the passenger compartment. With it, the entire interior of the car is illuminated.
Its lighting is sufficient to view a map at night, read literature or solve a crossword puzzle in your free time.

Bulb burnout
Frequent breakdowns are the burnout of light bulbs.
To gain access to this mechanism, you must do the following:
- The car must be installed in a position that will be beneficial for repairs.
- You will need a slotted screwdriver. With her help and a little attention, the spherical ledge is accessed.
It is also called the swing axis. With it, the diffuser is dismantled.
Note: After removing the cover, access to the lamp opens. All subsequent operations must be done only if it is necessary to replace the light bulb.
- The lamp is attached to the base of the electrical wiring by means of a special contact. With light pressure on it, the lamp independently disconnects from the contacts.
The extraction process is best done with a screwdriver that has a rubber handle.
- A new light bulb must be installed in place of the old one.
- In the case of repairing the electricity supply system itself, it is necessary to unscrew the four screws that secure the main part of the ceiling to the roof of the car.
- To disconnect the main part of the ceiling, it is necessary to disconnect the wire attachment unit. To perform this task, it is necessary to pull the plastic nozzle from the ceiling itself.
- Installing the ceiling, after repair, cleaning and other work, occurs in the reverse order.
Note. To ensure the full functioning of the installed lamp, you must make sure that there is tight contact with the base. The top cover, called the light diffuser, is inserted with one side into the luminaire body, and a slight pressure is applied to the other side until a slight click is obtained.
Flashlight for personal illumination
One of the interior lighting elements is a flashlight for individual lighting. It shines with a direct beam.
For one person, its lighting is enough. Sometimes it needs to be cleaned, repaired or replaced.
To access it you need:
- Turn the outer ring of the fastener clockwise. With a special screwdriver, with the utmost care, the body of the lantern is pryed off and the latter is removed from its place.
- To completely disconnect this mechanism, it is necessary to disconnect the wire block from the mechanism.
- The lamp is fixed with the help of special latches, which are somewhat reminiscent of the action of a spring. With a slight dilution of them to the sides, the light bulb and its cartridge are freely removed from the flashlight.
- The lamp is removed from the cartridge by simple turns counterclockwise.
- The lamp and the flashlight itself are installed in their original place by the same actions, but they must be performed in the reverse order.
Luggage compartment
Since the luggage compartment can be considered part of the car's interior, it must be clarified that there is also a lantern here. With it, you can illuminate the contents of the trunk.
In some situations, his work is indispensable.
To access this mechanism, you must perform the following steps:
- The exterior lighting in the car is completely turned off.
- To free the lantern from its location, you must use the tool. For this purpose, you can use a simple screwdriver. She needs to remove the flashlight from the .
Note: To dismantle the cover, you must disconnect it from two power wires. In order to exclude the possibility of a short circuit when using this lighting device, it is necessary to insulate its connection with a special adhesive tape or other sealant.
- The lamp is removed by pressing on the connecting elements. It occurs by analogy with the previous description of removing lamps from the socket.
- To turn on a new lamp, you must install it. Until it stops, it is pressed into the cartridge mount.
- To install the flashlight in its original place, it is necessary to insert one end of the lampshade into the casing connector, and apply slight pressure to the other. A slight click will characterize the complete connection of the lamp with the connector in the luggage compartment.
Panels Appliance
A lot of car interior lighting is located in the dashboard. The process of replacing it is one of the most difficult.
To work with the dashboard, you must:
Note: the full instruction manual for the VAZ 2110 car indicates the need for a complete disassembly of the dashboard in order to remove it. After the dashboard is disassembled, you can replace the faulty elements yourself.
- To perform work with electrical wiring, you should be safe and disconnect the minus terminal from the battery.
- The overlays are decorative. They must be separated from the dashboard.
- The steering wheel of the car is dismantled. The horn plate remains unchanged.
- The switches located under the steering wheel must be separated from the vehicle.
- When disconnecting them, you will need to disconnect the wires and their connection element.
- The headlight corrector has a regulator (specific position switch). It needs to be dismantled.
- The next step is to unscrew the nut, which is located under this regulator.
- The mounting block is opened.
- Access to the location of the fuses is opened (they can burn out, and therefore it is necessary to check their serviceability) and the relay box. It may be enough to replace them.
Here it is necessary to unscrew the screw securing the bracket. It is located on the left side. - The block of wires is disconnected from the ignition system. It is also necessary to unscrew the screw that secures the bracket.
- The tips, in the amount of two pieces, are disconnected from the brake light switch.
- The overlay on the console has two screws. You need to remove them from the car.
- The console bracket is released.
- The screw securing the instrument panel and the air duct must be unscrewed.
Note: All wires under the dashboard must be disconnected. For the convenience of the upcoming assembly of these mechanisms, it is necessary to mark them, since their number is large.
- Detach the panel wiring harness from the rest of the power supply system.
- The immobilizer sensor must be disconnected, namely its wires.
- Similar actions occur with the right side of the panel.
- The bracket nut is removed.
- Disconnect the wires coming from the cigarette lighter.
- The same operation must be done with wires.
- The glove box has a bolt at the top. It must be removed from the socket.
- Both screws of the lower instrument panel fastening are unscrewed.
- The seal is removed from the front left pillar.
- The plastic holders are dismantled.
- The same technology is applied to the right pillar.
- Remove ventilation grilles.
- Under them there are two bolts that must be unscrewed and removed.
- The dashboard is slightly, about 10 centimeters, retracted into the cabin.
- After the dashboard remains in the cabin, it is necessary to disconnect the remaining wires near the left door pillar and next to the steering column.
After carrying out these points, you can safely proceed to the replacement of sensors, backlight and other components of the dashboard. The assembly process occurs in the opposite order of disassembly.
The corresponding video and photo will help you do everything right with your own hands. Of course, if everything is done as required by the instructions.
Parts, bulbs, fuses, etc. can be purchased at a specialty store. The price for them is not too high.
You may have to spend time collecting details. Their diversity can lead to a lot of different situations.
Sometimes, parts just don't fit any mechanism. The best option would be to use an old part as an example.


