It is very unpleasant when the battery discharge light begins on the road, and the creaking or whistle comes from under the hood. With a lot of probability, you can assume that the generator bearing - front or rear bearing has failed. Related symptoms - boiling and fast discharge of the battery, an abnormal reaction of light headlights to increase (decrease) engine speed.
However, the reasons can be not covered in a mechanical malfunction, but in the electricity - in the fuse box, the wear of the generator brushes. The source of the dissertation may be a bearing breakdown, for example, a guide roller or simply weakening the drive belt. When initial inspection, it is possible to determine that it is in the bearing, for example, finding a strong overheating of the generator shirt.
The frequency from which they fail can be different. It all depends on the operating conditions (heat and, on the contrary, the abundance of moisture, dirt, reagents that are treated in winter roads), as well as from the quality of the bearing itself. There is not guess.
Vologda brand
However, experimental by the owner of one of the most popular domestic marks, VAZ-2112, amounted to something like a rating of the generator bearings installed on these cars. For native "genes", how this mechanism is lovingly called, under the marking of VAZ 2112 3701010 (80 amps), bearing with an outer diameter of 47 mm (front) and 35 mm (rear), internal, respectively, 17 and 15 mm are needed. The marking of them looks like this: front bearing - 6303, rear - 6203. This is for the generators of the last years of release.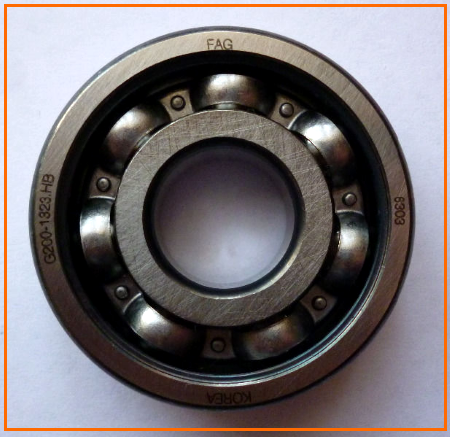
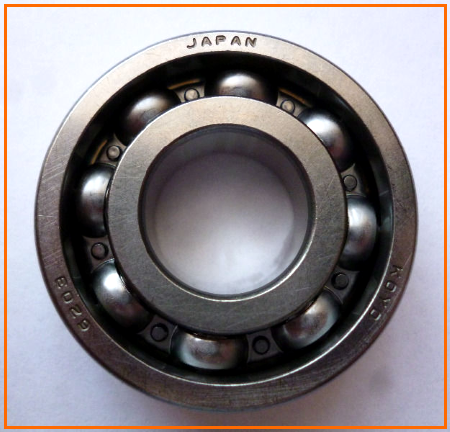
On earlier - options 6302 and 6202 were installed. But in practice it is possible to meet such a combination of 6303-6202, which, however, is not particularly important. It is much more important not to guess the manufacturer. The most reliable in the Wednesday of motorists - VAZ fans are considered VBF products - the Vologda Bearing Plant. It follows a series of imported producers, of which, judging by reviews on the Internet, the price is most suitable by the formula + quality, Japanese Koyo products. But at Kraft (Poland), Andycar (Czech Republic), Trialli (Italy), and a number of other complaints a lot. As already mentioned, there is a case of case - regardless of the author. Especially since the "free" market can be stumbled into Chinese counterfeit.
Prices for bearings for the VAZ-2112 generator are as follows: VBF - 40-130 rubles., Koyo - 30-110 rubles, triali - from 200 to 700 rubles.
Disassemble for 6000 seconds
Replacing the generator bearings on the VAZ-2112 business is troublesome, but not complicated. Bottles are mainly in the task: how to bring out to remove the "gene" - for our repair it is necessary. And it is removed - after unscrewing nuts and bolts, dismantling the protection of the crankcase - below. If there is no lift, it is very uncomfortable, closely, the scurrid nuts are not immediately.
But finally, the generator lies on the workbench, as if on an anatomical table. So, let's start, having previously cleaned it from the mud with a metal brush.
- First of all, at the junction of two halves of the case, we will make tags, one against the other, to combine them correctly when assembling.
- Rear remove a plastic casing with a screwdriver, unscrew the integral relay, disconnecting the wire from it, at the same time check the condition of the brushes.
- Remove the diode bridge by unscrewing 4 screws and one nut, while carefully treat the washers under them, so as not to lose - they are plastic, dielectric; If we replace with metal, we get fatal for the generator KZ.
- With a screwdriver reject the winding terminals, disconnect the "plus", turning attention to the absence of a contact oxide. In the case of which it should be cleared with sandpaper.
- Then, unscrewing 4 bolts, disconnect two halves of the case. If it does not work out immediately, gently cutting them with a hammer at the place of connection. If the bolts do not want to give up, use a shock screwdriver.
New bearing in a new way hits
The actual replacement of bearings is as follows. The screw of the pulley of the drive belt is unscrewed, while again the screwdriver needs to block the rotation of the rotor, but only not behind the wings of the cooling impeller (they are soft, from thin tin). The pulley itself is removed, often with the help of a Cyanka or a special puller. Then the old bearing is pressed. This is done using two screwdrivers, which it comes to the base from the opposite sides, and screwdrivers in the center rests in the legged wrenches (8 or 10). This creates a design similar to two levers. The bearing with a slight force scalins the anchor axis, preferably sprayed WD-40.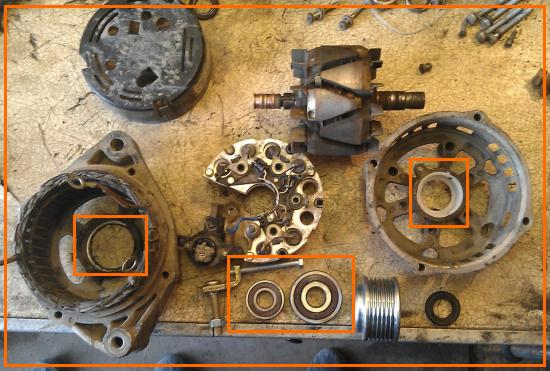
The second bearing is pressed into the back of the back of the housing. It is knocked out by placing a larger diameter on some pipe than an external clip. You should also beat the pipe, but with a diameter that coincides with the size of the bearing.
Ideally, the hub key from "Gazelles" is fit.When pressing the front bearing (on the anchor axis), it is necessary to select the size of the tube under the diameter of the internal rope. After planting the rear bearing in the housing nest, it must be fixed with the core, you can in the footsteps from the factory core. Well, then we all collect in the reverse order, not forgetting about dielectric washers and labels at the scene of the hull halves. Well, for pleasure, it remains to turn the pulley after the assembly. No backlash and hissing should no longer be by definition.


