Owners of VAZ "nines" sooner or later have to face the need to remove the dashboard, which can be high or low. If the price for such work from professionals seems too high to you, then you should not be upset ahead of time - such services can be performed independently, using our advice.
Removing the low panel
Dismantling the low panel may be required not only to replace it, but to carry out repairs of varying degrees of complexity. The wiring diagram of the VAZ 2109 to the injector will be our main assistant. In addition to her, we need standard set of tools.

Tip: For convenience, remove the steering wheel, and the dashboard becomes accessible for removal.
The work algorithm will be approximately as follows:
- first of all, the handles that control the interior heater and the operating modes of the electric motor of the heating system will interfere with us, so they will have to be removed;
- on the sides there are screws that hold the decorative strip. We turn them out and pull the cover over ourselves a little;
- we turn off all the pads with wires, but it is better to mark them in different colors so that the wiring to the VAZ 2109 injector will subsequently return to its place. From here, the heated rear window, fog lights, exterior lighting and alarm systems are powered;
- now you can turn off the cigarette lighter and its backlight;
- the panel that controls the heating in the passenger compartment is mounted on 4 screws, which must be unscrewed together into the screws of the dashboard visor. You can read about other difficulties of this model in the article.
We proceed to the final stage of dismantling
After removing the visor, it is necessary to squeeze the clips and get the entire instrument cluster:
- unscrew the nut that secures the speedometer drive and remove its cable;
- then we dismantle the economizer hose, and then the power wiring unit (red and white). We discard the cable, which is responsible for the daily mileage of the speedometer, set it aside separately;
- according to the photo, we remove the knobs that turn on and adjust the brightness of the backlight, as well as the hydro-adjustment of the lighting. We take a socket wrench in our hands, unscrew the nuts securing these regulators to the panel body;
Now you can grab the ignition switch. In the video below, you can learn how to launch from a button. Disconnect the block with wires. Now you need to snap off the latch that blocks the steering wheel.
- To do this, insert the key into the ignition switch and leave it in the zero position;
- the steering column pipe is dismantled together with the lock;
- you need to push a little air damper actuator, and remove the decorative handle;
- unscrew 2 screws and remove the thrust guide;
- the last step will be to remove the panel-to-body screws (side and bottom screws). It remains to remove the panel itself.

Now we can start performing the actual repair work. We will need the VAZ 2109 wiring to the injector in order to carry out a reverse installation.
Let's look at the difference between the instructions for removing the high panel on the "nines":
- firstly, we remove the steering wheel, as it will interfere with the repair;
- you can remove the plastic handle from the drive rod;

- just as in the case of the low panel, we take out the decorative overlay, for which you need to unscrew the fastening screws;
- we remove alternately the cigarette lighter with an ashtray and the handle that regulates the power of the fan electric motor;
- we get the decorative heater levers;
- we disconnect the block of wires that feed the stove fan and the wires that feed the backlight lamp of the heating panel - for this we need a VAZ 2109 wiring diagram for the injector;

- remove the handle that regulates the power of the fan motor;
- The wiring harness that powers the heater mode switch can be removed at the same time as the contacts related to the wires supplying the panel illumination lamp. You can learn about the design features of the ninth family by reading
We remove the radio tape recorder and so on
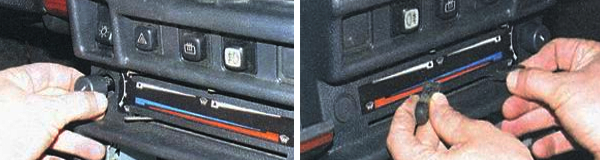
We continue the procedure by removing the decorative control knobs, one of which is responsible for the hydroadjustment of the headlights, and the other adjusts the power of the dashboard illumination.
Now you can start to dismantle the lighting regulator and hydrocorrector.
We'll have to arm ourselves with a socket wrench suitable for the fastening nuts:
- push them inside, you can get them later;
- you need to unscrew the air deflectors, which are responsible for heating the side windows, located on the left and right sides;
- take a Phillips screwdriver and unscrew the screws that secure the top plate to the surface;
- you can dismantle the outdoor lighting regulator from the panel - for this purpose, we pry it with a flat object, for example, a screwdriver, and take it out as long as the wiring allows;
- disconnect the power supply harness from the switch;
- take off do it yourself the radio tape recorder and take out the standard socket for the radio equipment, if any;
- unscrew the central screw that secures the panel overlay;
That's it, you can remove the overlay itself.
Tip: Before doing this, slide the latches under the dashboard. We arm ourselves with two flat screwdrivers, insert them along the edges of the panel and lift it by slightly pressing from the sides. You can dismantle the entire torpedo completely.
Now the time has come for the power wires from the cigarette lighter and its backlight. You can disconnect the alarm wiring and the backlight.
- it was the turn of the decorative lining of the front speaker, as well as the switches for heating the glass and rear foglights. You can remove the speaker itself;
- then the car enthusiast should put his hand under the speaker into the hole, after which we disconnect the wiring harnesses that feed the heating and fog lights;
How to remove the instrument cluster
We unscrew a couple of screws securing the instrument cluster and remove it. We slightly pull it towards ourselves, unscrewing the fastening nut, and remove the speedometer cable.

- now you can turn off the unit with power wires and put it aside;
- we act in the same way with respect to the ignition switch, and also discard the "mass" wire from the ignition relay;
- on each side, unscrew a pair of lower screws that secure the console;
- you can disconnect the wires that power the glove box lighting;
- we unscrew the screws that hold the heater panel, after which it can be shifted downward so as not to interfere;
- we unscrew the screws of the heater rod in the cabin;
- it remains to unscrew the last panel screws - the central and upper side ones. The panel is completely in our hands.
In conclusion
This is how we made sure that the engine compartment wiring of the VAZ 2109 to the injector is not super complicated, and most types of repair work are within the power of an ordinary car enthusiast. Nevertheless, .
Wiring VAZ 2109 injector to help with removing the torpedo
3.9 - Ratings: 87


