The VAZ 2110 model cannot be called modern and advanced, and therefore a hydrocorrector is used here instead of a modern electrocorrector of head optics. Today we will talk about how to identify a breakdown and replace the hydraulic corrector, as well as whether it is possible to put an electric version instead of a standard device.
Why does it fail
The reasons for the breakdown of the hydraulic corrector are standard:
- Temperature drops that disable the hydraulic component of the unit;
- The use of rubber for seals is not of the highest quality, which leads to leaks of working fluid.
If a leak occurs, you can no longer avoid replacing the unit.
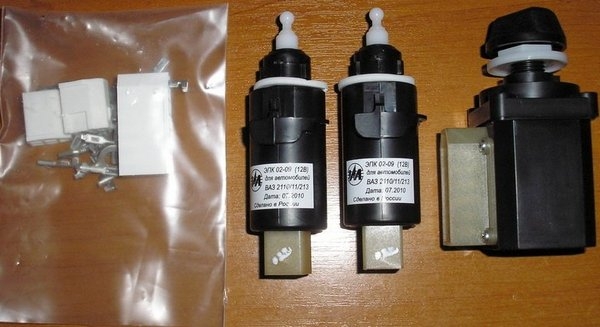
Design
Structurally, the headlight hydrocorrector is a set of the following components.
The principle of operation of the device is based on the following - the corrector maintains the required pressure. If the driver switches to dipped beam, the pressure is reduced in the system, the rod with the help of the piston turns the headlights down. If the liquid has leaked out, it becomes impossible to correct the direction of the light.
How to find a breakdown
Many people blame the hydrocorrector for the refusal to adjust the headlights and rush to replace it as soon as possible. But don't jump to conclusions. There may be other causes of the malfunction.
- Pay attention to the presence of hydraulic fluid leaks. If not, check the stroke.
- To check the stroke of the rod, the slave cylinders are dismantled. The normal figure is in the range from 6.5 to 7.5 millimeters.
- It is impossible to repair the corrector of the hydraulic type provided by the factory for the VAZ 2110, since the design of the device is not collapsible.
- In the event of a malfunction, the entire assembly is subject to replacement, including the cylinders and pipes.
Replacing the hydrocorrector
First, consider a situation in which a failed headlight hydrocorrector is replaced with a similar device. The replacement procedure is not as difficult as it seems to many. Follow the instructions and you will succeed.
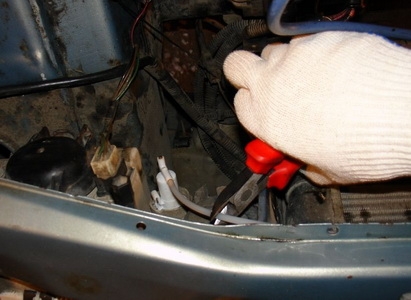
- Disconnect all existing fasteners, pipe clamps. The device needs to be disconnected from the body of your vehicle.
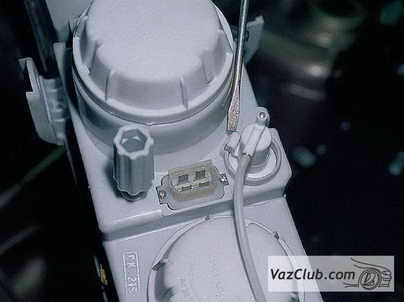
- Now we are heading to the salon. It is easy to remove the control handle of the corrector. To do this, she reaches out to herself. It is located, if anything, in the cabin on the dashboard.
- Free yourself up the space you need to repair. It is difficult to replace the hydrocorrector on the "top ten" largely due to the fact that the holes for the passage of the tubes of the device are located very inconveniently. It is here that most beginners have difficulties, they prefer to give the car to a service station. But do not rush to prepare a tidy sum of money.
- To access the unit, remove the coolant reservoir. That is, antifreeze. Having cleared the passage from above, you will continue to perform the procedure for replacing the hydraulic corrector without any problems.
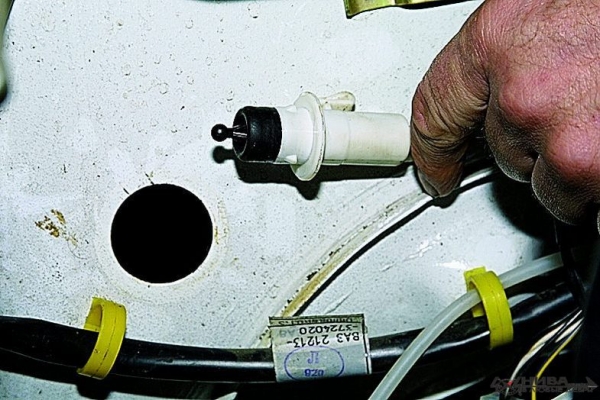
- Remove the cylinder. This part of the work is done from the salon. Pull the corrector handle towards you to remove it. Now dismantle the cylinder with a 22 mm head.
- There you will see a fuse cover that you need to open and pull. This will put the cylinder in a hanging position, and the hoses will hold it.
- The corrector can now be removed. Press the latch on the slave cylinder and turn it clockwise until it stops. So the device will easily leave its seat. A similar operation is performed with the second headlight.
- The hydrocorrector from your car is pushed into the passenger compartment and removed.
- Installation of a new device is carried out in strictly reverse order of dismantling.
- Beforehand, be sure to make sure that the new hydraulic corrector effectively copes with its tasks, so that you do not have to re-disassemble the far from the most accessible unit.
Replacing the hydrocorrector with an electrocorrector
From the name it becomes clear that the electric corrector operates on electricity, that is, it requires a connection to a storage battery.
It is not necessary to look for the reasons for such decisions from the owners of the domestic “ten” for a long time, since the electric corrector is distinguished by its reliability and high efficiency. Its breakdown occurs several times less often compared to a hydraulic corrector.
Many owners of the model doubt whether it is possible to make such a replacement and use an electric corrector where the hydraulic unit previously functioned. Sure. For this, the use of a standard device or a device borrowed from another car is provided.
The procedure itself requires several consecutive steps.
- Disconnect the negative lead from the battery.
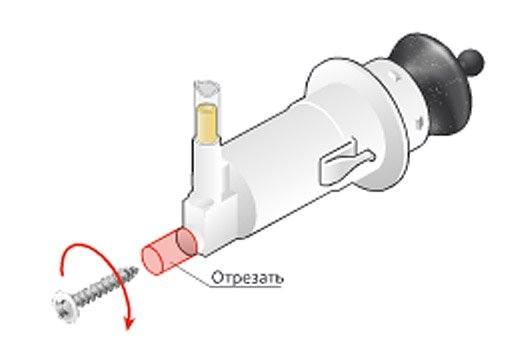
- Dismantle the hydraulic corrector cylinder from the headlight, as we described in the previous section.
- Be sure to install a new O-ring during replacement.
- Having gone to the salon of your car, remove the control handle of the main cylinder of the hydrocorrector. It is held by a 21 mm nut.
- The positive wiring harness is connected to the 20th socket of the Ш2 block in the mounting block of your car.
- The minus of the electric corrector is attached to the body pin. There are several of them and they are located under the dashboard.
- The harness of the new regulator can be laid along the previously used tubes of the old hydrocorrector.
- The harness pads are connected to the actuators.
- Return the negative lead to the battery and check how the new device works.
The cost of an electric corrector today is about 1-1.5 thousand rubles. Depending on the model you choose, you will receive a certain number of adjustment positions. There are at least two of them, but the most common ones provide for 4, 12 and 15 positions.


