As a rule, the reason for the malfunction of the low beam on the VAZ 2110 is burned out light bulbs. However, sometimes the lack of lighting is associated with the failure of other nodes. Below we will look at how the lamps are replaced, as well as the most common reasons why the dipped beam does not light up and how to fix them.
Replacing lamps
Choice
The process of replacing lamps on a VAZ 2110 is extremely simple. However, before starting this operation, it is necessary to purchase new lighting elements.
This vehicle is factory fitted with H7 halogen bulbs. On sale today there is a large selection of lamps, and not only halogen, but also other types - xenon and LED.
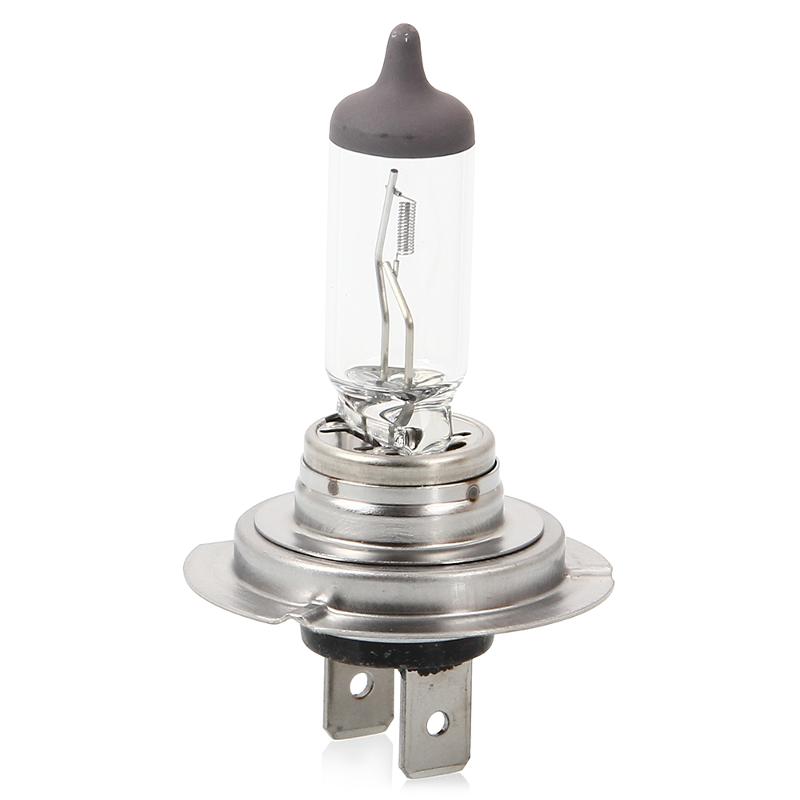
Photo - H7 halogen lamp
On the forums of motorists, their features, advantages and disadvantages have been repeatedly discussed, therefore, below we give only a comparative table with the main characteristics of these lamps:
Note!
The most optimal color temperature of the luminous flux is in the range of 4300 - 5000 K.
I must say that in addition to the data from the table, when choosing, you should also take into account the penetrating ability of the luminous flux. According to this parameter, halogen lamps are in the lead - they illuminate the road much better in rain, fog or snow.
In addition, the installation will require intervention in the electrics, in particular - the installation of additional equipment (ignition units). Therefore, it will not work to perform their high-quality and safe installation with your own hands.
Note!
Experts recommend changing bulbs in pairs so that both headlights shine equally.
In addition, their service life is approximately the same, so if one of them burns out, the second will soon fail.
Each car owner must choose himself which light on the VAZ 2110 will be better based on his own financial capabilities, weather conditions for car operation, etc.
Lamp Replacement Procedure
The instructions for replacing bulbs look like this:
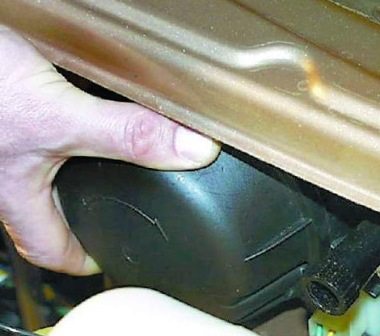
- First of all, you need to open the hood and disconnect the terminal from the battery.
- Then you need to remove the plug located closer to the wing.
- Next, you need to unfasten the spring clip, which presses the bulb to the headlight housing.
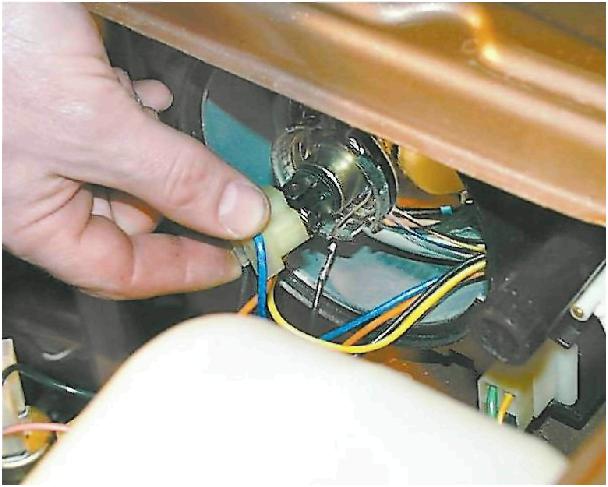
- After that, you should carefully disconnect the block from the contacts and remove the light bulb itself, since nothing else bothers her.
- Now we need to insert new bulbs in the same position in which the old ones were located, connect the block to the contacts and fix everything with a bracket.
- At the end of the work, replace the plug.
Note!
When replacing lamps, it is important not to touch the glass with your fingers.
Otherwise, fatty spots will remain on the surface, which will lead to overheating and failure of the lighting element.
This completes the lamp replacement. As a rule, this operation even for beginners takes several minutes.
Advice!
Many car owners are interested in how to improve the headlights?
The easiest way is to disassemble the headlights, wash them, replace the glasses if necessary and adjust the light beams.
As a rule, these simple procedures give good results.
Replacing the fuses
If the lighting still does not work after replacing the bulbs, the fuses should be checked. The mounting block is located on the left side of the steering wheel.
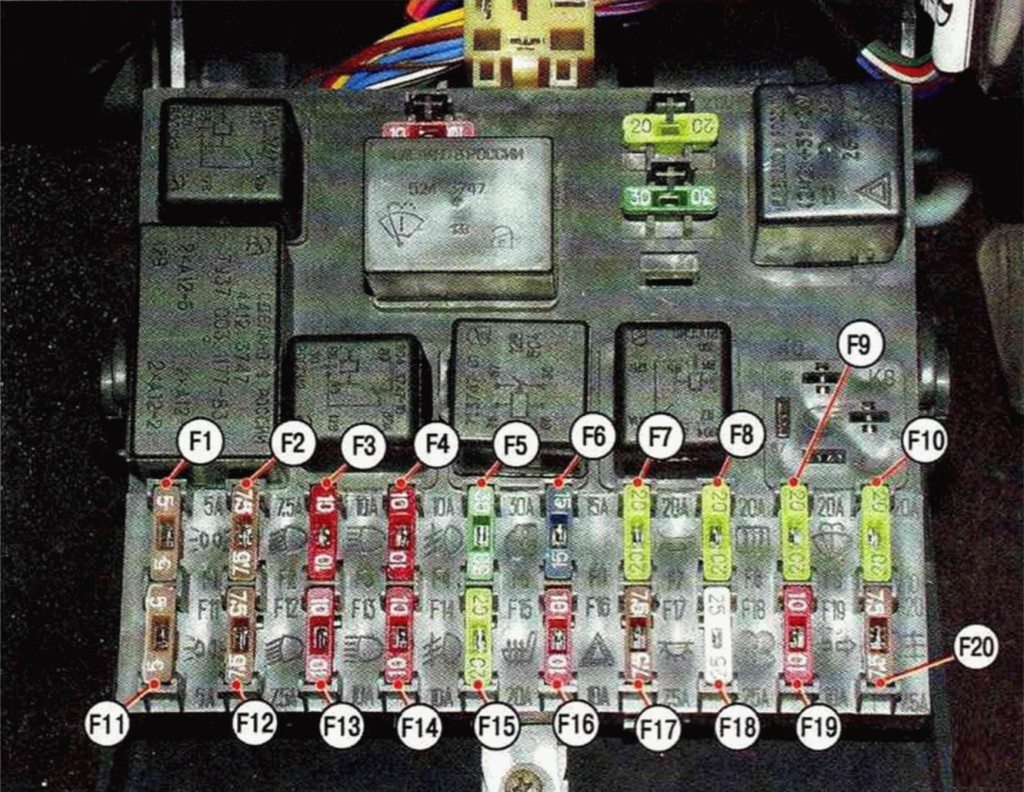
The fuse F2 is responsible for the low beam in the left headlamp unit, and the fuse for the right one is F12. It must be said that a fuse malfunction cannot always be identified visually. Therefore, it is better to install new fuses.
Repair
If the fuses are intact, but the lighting does not turn on, you need to find the cause of the malfunction. To do this, you need a test lamp, or even better, a multimeter.
I must say that it is not difficult to repair the low beam on the VAZ 2110 - you just need to ring the circuit and find a gap in order to fix it.
Below is the best course of action:
- Since often the cause of the low beam malfunction is the low beam relay on the VAZ 2110, you can start the check from it. With the help of the device, you need to determine whether the voltage is supplied to it and whether it is at the output. If there is no voltage at the output, then the relay needs to be replaced.
- If the relay is not energized, and it is not at the fuse terminals, then it follows from the switch to the fuses, as well as the switch itself.
- If there is voltage at the output of the relay, you need to check if it is supplied to the lamp connector. Burned or oxidized contacts are often the cause of the malfunction. If the dipped and main beams disappeared immediately, then the ground wire in the headlamp may have come off.
Note!
The cause of a relay malfunction is often oxidized contacts that just need to be cleaned.
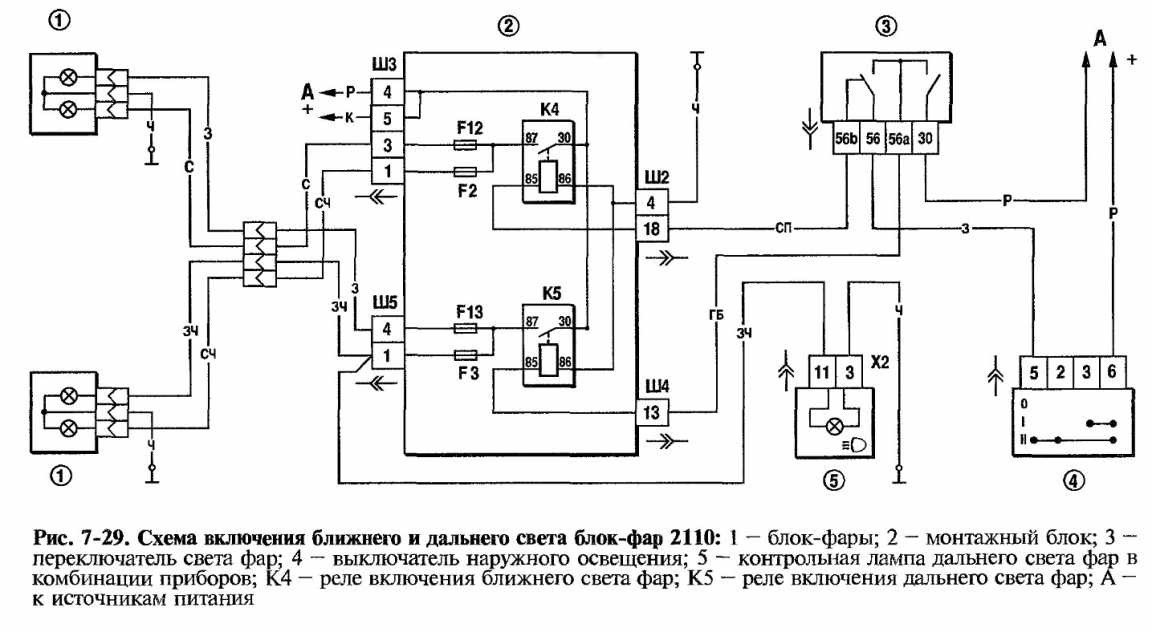
Thus, by checking all the main components along the chain, you will definitely find the cause of the malfunction. To simplify this work, the dipped beam circuit on the VAZ 2110, which is given above, will help.
Adjustment
Once a year, the low beam on the VAZ 2110 should be adjusted. This procedure is necessary in order to increase the efficiency of lighting, as well as to prevent the dazzling of oncoming vehicle drivers.
Below we will take a closer look at how to adjust the low beam headlights:
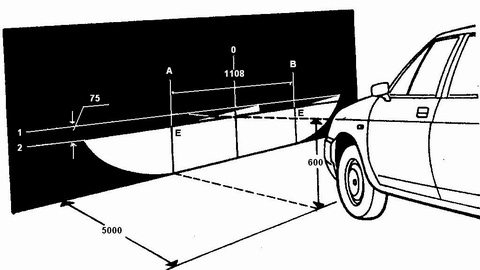
- You need to find a flat area with a wall that will serve as a screen.
- The car should be parked at a distance of five meters from the screen. A passenger must be seated in front. You can also put a load of 75 kilograms in the car.
- On the screen, draw a horizontal line at 600 mm, as well as a second line 75 mm below the first.
- Then you need to draw three vertical lines - the two extreme lines should correspond to the centers of the headlights, and the middle should be located in the middle between them.
- The handle of the headlight hydro-corrector should be moved to the position corresponding to the minimum load.
- One of the headlights must be covered with cardboard or a sheet of plywood.
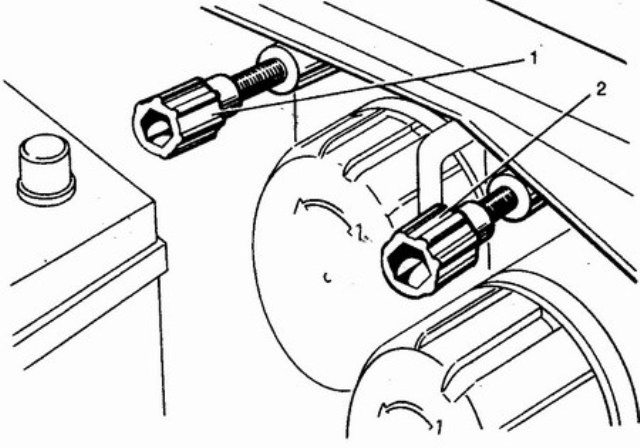
- Then the light beam is adjusted according to the scheme. The adjustment is carried out by screws with plastic heads, which are located on the back of the headlight unit. They rotate the optical element around the horizontal and vertical axis.
- Next, you need to adjust the second headlamp in the same way.
Here, in fact, is all the information on how to adjust the dipped headlights.
Output
The dipped headlights on the VAZ 2110 may stop shining for various reasons, however, in any case, the malfunction can always be found and fixed on your own. At the same time, do not forget about adjusting the direction of the light beams, on which the efficiency of the head lighting largely depends.
You can get additional useful information on a designated topic from the video in this article.


