Snowmobile - a unique vehicle for daily use in winter. It is used for movement in the snow-covered area during scientific expeditions, excursions, hiking, animal hunting, territory protection. Such a product can be purchased in a specialized store or make it yourself. If the finished structures have a rather high price, and not every person is able to afford such a purchase, then improvised - a more affordable alternative, made of well-made materials and equipment.
The homemade snowmobile can be made with their own hands from the available technique. For these purposes, experts recommend using:
- chainsaws;
- motoblocks;
- motorcycles.
Important! To make a portable snowmobile at home, be sure to have skills to work with plumbing tools.
Drawings, options for finished works
Snowmobile design must be started from creating a drawing of the desired product. It will help in the process of work to manufacture practical and functional equipment, which will serve not one year.
 Option of finished work
 If you can use the finished drawings to create a snowmobile from a motor-block or a motorcycle, then for the design of chainsaws - they are not provided, since each tool has its own specifications and features.
Snowmobile from chainsaw
Council. Snowmobile can be made as caterpillar and ski.
Before proceeding with the production of a snowmobile from chainsaws, you must select the equipment that will have all the necessary characteristics. The optimal option for this purpose is a chainsaw "Friendship", "Ural" and "County" (the power of these tools is ideal for creating high-speed snowmobiles).
Important! The engine and gearbox are the main details of the chainsaws that are used in the process.
The snowmobile design consists of four parts:
- Caterpillars
- Transmissions.
- Engine.
 Chainsaw Ural
 The homemade snowmobile assembly is made not on some kind of proposed scheme or standard drawing, but based on the materials and tools that are at the disposal of the wizard.
Snowmobile assembly instructions from chainsaws
Product assembly is a fairly interesting job. It consists of several consecutive stages that must be accurate and responsible.
- The first stage is the assembly of the frame base of the future homemade snowmobile. Steel corners will be required to work (size - 50 x 36 cm) or steel sheets (thickness - at least 2 mm). From the corners make the middle part of the structure, and from the sheets - the front and rear.
Council. To give the necessary stiffness of the structure, the metal is bend under angle of 90 degrees.
- Carefully make two cross-cutting holes for placing the shaft of the tracked mechanism and the guide devices of the tracked wheels (the tensioning devices are installed on both sides of the spars).
Important! The front structure is specifically designed to tension the second stagnation stage, it also helps in adjusting the caterpillar itself.
- Special brackets are neatly welded to the bottom of the spars (they are attached to the same distance from each other), in their open grooves and set the support rollers.
- Rollers (in rubber covers) are located on five axes, each of which is attached from the bottom side of the open grooves.
- Between each of the elements, special sleeves from duralumin (they are made of a suitable pipe).
Council. In order not to spend time on the manufacture of rollers and axes for them, they can be borrowed from the old equipment for digging potatoes.
- The axis of the brackets themselves are fixed using nuts and monitoring (they are designed to enhance the snowmobile frame, keep spars at a certain distance from each other).
- Of the three metal corners make racks for fastening the trained gearbox gearbox, the intermediate shaft of the chain transmission is installed.
- The prepared frame is installed for the user for the user (for these purposes a suitable box or car seat is used), it is fixed on the site between the middle and the rear part of the structure.
 Snowmobile from chainsaw
 - On the front area of \u200b\u200bthe frame make a hole for placing the steering wheel, it makes it from the pipe with welded handles of control.
- In places of attachment of snowmobile racks, metal brazers are installed (they strengthen the design, make it more durable and reliable).
Important! In order for the future homemade snowmobile to have a good passability of snow-covered terrain, it is equipped with a caterpillar mechanism.
- A snowmobile drive shaft is made from the metal pipe, a special round flange is inserted into it for fastening gear wheels.
- To create a steering, use equipment from old motorcycles or threshing mopeds.
The finished snowmobile has a small weight, easily placed in the trunk of the car for transportation over long distances. His management is so simple and clear that even a child can easily use it.
Snowmobile from Motoblok.
Motoblock is another version of the equipment that is used in the process of making a snowmobile with your own hands. Its design is practically no need to redo, as it is initially multifunctional.
There are three types of motoblock snowmobiles:
- wheeled;
- on caterpillars;
- combined.
 Motobl
 Before starting working with a fiberboard, it is necessary to determine the type of future design. From him and will depend on the complexity of the work of the master, as well as the duration of the whole process.
Construction of a snowmobile from a motoblock
Important! To create a wheeled snowmobile, you do not need to redo the steering system, you need to pay special attention only to the frame of the device and ski.
- The snowmobile frame is made of metal pipes or corners (it must have a rectangle shape).
- The finished base attach a box or a chair to place the driver.
- Separately make skis from corners and sheet metal, weld them to the frame.
- The finished design is attached to the motoblock, used by destination.
 Drawing: Motoblock Snowmobile
 Motorcycle Snowmobile: Masters Guide
Make a snowmobile from a motorcycle is not so simple. If the assembly of previous products is practically no difficulty, then with this design will have to suffer. It will require not only tools, materials and techniques, but also skills in working with a welding machine and other equipment.
Important! Motorcycles "Ural", "Izh" and "Dnipro" - the most suitable models for making a snowmobile with their own hands.
Snowmobile design technology
- Make a suitable frame from metal pipes of different diameters and steel corners. It is performed in the form of a rectangle (its dimensions - 150 x 43.2 cm).
- Construct a steering beam made of metal angles (its dimensions - 50 x 50 x 5 mm), its parts are trimmed with dense metal lining. The finished design is installed in a horizontal position on a drilling machine.
 Motorcycle IZH
 - Frame and ready-made beam are treated in places of compound, prepare special grooves for reliable fixation of elements.
- The front frame of the frame is equipped with a solid corner.
- Fasten the seat to the frame frame.
- Make holes in spars.
- Between the steering and middle section welded a channel.
- Pick up a suitable tracked asterisk and rubber tape for further installation (suitable dimensions - 2200 x 300 mm, thickness - no more than 10 mm).
- The caterpillar itself is gently crumbling, so that the material does not resolve in the process of use.
 Motorcycle snowmobile
 - Install the transmission that consists of the front and rear axle. The front is the presenter, it consists of a tubular shaft, caterpillar stars and rinks (the asterisks themselves are fixed on through bolts). The design of the rear axle consists of a tracked drum and a tubular shaft.
- Skis welded to the design of a snowmobile (for their manufacture, steel sheets and metal corners are used).
The control system of a self-made snowmobile from a motorcycle is quite complex in design. It consists of:
- longitudinal thrust;
- transverse thrust.
From the presented information, we can conclude: the homemade snowmobile from the elements of the motoblock, chainsaws or a motorcycle - reality. It can make every wisp master. For productive work, only certain skills, equipment, tools and materials will be required.
Homemade Snowmobile: Video
Remembering the history of creating a homemade snowmobile, realized how long my passion for the design of technology began. Another youth (and now I am already a pensioner) received a specialty for a mechanic and mastered my own welding case, other specialty metalworking. But the knowledge of the design, to tell the truth, "boast" could not, and indeed learn. He built on the host of all sorts of "diamonds" on wheels and caterpillars: went on them and off-road, and in the snow, but no reliability, no beauty in them.
But at the beginning of 1988, "model director" came out, in which there was an article about a snowmobile "Caterpillar around Ski". That's where it began!
We have such a place that snowproof lies for half a year and even more! Local roads are clean, as a rule, not on time, and so that only an all-terward truck can pass. Well, there is nothing about parcels. In addition, I had hobbies: hunting and fishing. That's all this and came to make a good sweaty snowmobile.
Built for myself, helped friends, native, gained experience. Constantly improved the design "According to the Evolution laws": replaced heavily - on a slight, unreliable - on a strong, introduced suspension: Spring, spring, shock absorbers. Total built more than a dozen snowmobiles: on caterpillars with wooden and polyethylene cams around Ski bipiz; rubber with rollers block; and with one control ski, and with two.
story will be negotiated about the last sink. I can not say that it does not have drawbacks, but in his design I invested all the accumulated experience and the car turned out, it seems that, successful, although without excesses (or, as they say, is utilitarian), but it looks good, and reliability on height.
The snowmobile layout is chosen the most common, both on similar domestic machines and on foreign: two front controlled skis; Power unit, located in front of the hood; Next - a caterpillar block, and over it the seat and behind - the trunk. The total snowmobile length is 2300 mm, the width of the outer edges of the ski of 900 mm, height before the steering wheel - 1000 mm, to the seat - 700 mm.


1 - controlled ski (2 pcs.); 2 - controlled ski suspension (2 pcs.); 3 - arc (pipe Ø32); 4 - hood (from the side trailer of the "Java" motorcycle); 5 - windshield; 6 - steering wheel; 7 - fuel tank (welded from two mopeds); 8 - seat; 9 - instrumental box; 10 - trunk fence (pipe Ø16); 11 - mudguards (steel sheet S0,5); 12 - spring shock absorber suspension of tensioning pendulum levers of the caterpillar block (2 pcs.); 13 - headlights; 14 - Crawler Block

1 - Lower spar (pipe 28 × 25, 2 pcs.); 2 - upper spar (pipe 20 × 20, 2 pcs.); 3 - M-shaped bracket attaching the body bearing body of the extension of the output shaft of the power unit (pipe 28 × 25); 4 - under-oblique interlayer rack (pipe 20 × 20); 5 - removal (pipe 28 × 25.2 pcs.); 6 - the bearing plate of the steering shaft glass (steel sheet S3); 7 - a glass of steering shaft (pipe Ø32); 8 - steering column (pipe Ø32); 9 - arc stand, 2 pcs.); 10 - Seasoned frame (tube Ø20); 11 - Seasoned Stand (Pipe Ø20); 12 - the strain of the instrumental box (steel corner 20 × 15); 13 - Woven bracket attachment of the caterpillar block and caterpillar tension (2 pcs.); 14 - Bracket (pipe 20 × 20, 2 pcs.); 15 - half-third of the trunk platform (pipe 20 × 20); 16 - UCHO mounting rear shock absorber (steel S4,2 pcs.); 17 - trunk semi-grade boom (pipe 15x 15.2 pcs.); 18 - Plug of the lower spar (pipe 28 × 25.2 pcs.); 19 - traverse (pipe 28 × 25); 20 - cross-either (pipe 28 × 25); 21 - cross-column suspension (pipe Ø16); 22 - Motor subframe (pipe 28 × 25); 23 - tie-support (steel plate); 24 - crossing the lower spars (pipe 28 × 25); 25 - screed lock of the fuel tank; 26 - longitudinal element of the seat niche (pipe 20 × 20.2 pcs.); 27 - Pokworn sleeve (cycling, reinforced, 2 pcs.); 28 - Schroke Schwerny (pipe 20 × 20, 2 pcs.)


Under the hood:
a - view of the right; b - view of the left
Power unit (engine, clutch and transmission box in one block) - Tula 200m manufactured by TMZ (Tula Machine-Building Plant). He was put on any motorcycle produced in Tula: scooters (including in the cargo "ant), motorcycles, etc. The unit is quite reliable, although it is heavy.
The power of the new motor was 11 hp. With the number of revolutions up to 3600 per minute. But he is already not one ten years old. However, the forces are eight-nine, according to my feelings, it is still preserved in it. The engine of 196 cm with a working volume of 196 cm3, two-stroke and operates on a mixture of low-octane gasoline with engine oil (type "Autol") in a ratio of 10: 1.
The cylinder is equipped with regular coercive air cooled.
The gearbox has a gear ratio of 2.353.
To transmit rotation from the secondary (output) shaft on the helmet of the drive shaft, it was necessary to make a welded extension from the pipe with slot tips. At one end, the inner slots are cut directly in the pipe (to attach the extension to the shaft). On the other - the outer slots for the adapter, the landing space for the bearing and the thread M20x1.5 for fastening the stars on the extension, are made on a welded tip.
Looking forward, I note that exactly the same tip is welded to the drive shaft of the caterpillar, which is made of the stretch rear axle of the Caterpillage from the snowmobile "Buran".
Snowmobile frame - spatial, cooked from steel pipes of rectangular, square and round sections.
The base of the frame is two paired tubular spars - upper and lower. The top spar of each pair is made of a pipe with a cross section of 20 × 20 mm. Of the same pipes and most of the auxiliary elements: intermediate crossbars, sores and even the rear frame of the luggage site. Lower spars - from the pipe with a cross section of 28 × 25 mm - this is the thick pipe in the frame design. From the same pipe, front traverse, front crossbars and consoles, the upward ridge.
It must be said that the pipes frame - the cross section of a small and not even fat-walled. Therefore, in places where the holes drilled, the bushings inserted in them and welded in a circle.
The add-in frame (rack, arc) is made of a round tube with a diameter of 20 mm - from old chairs, thin-walled, but strong enough. But it was difficult to weld them, but if it is done with a semi-automatic apparatus, the process is much easier. The trunk frame under the seat, as well as the framework of the median part of the site, from the equal 15-mm corner. Between these frames, I lay down long-term things, such as skiing. The steering column - from the pipe with a diameter of 32 mm - built into the front of the superstructure. Swivel pivot sleeves are cut from cycling and welded traverses. In the frame are also integrated (welded to the rear ends of the lower spars) brackets of caterpillar tension knots. The same brackets serve also in places of attachment to the frame of the bearings of the balancing shaft of the caterpillars. In addition, numerous ears are welded to frame elements, eyelashes for the installation of a power unit, fuel tank, seats, shock absorbers, etc.

1 - extension cord; 2 - Tip for the nozzle on the shaft; 3 - Tip for the drive gear
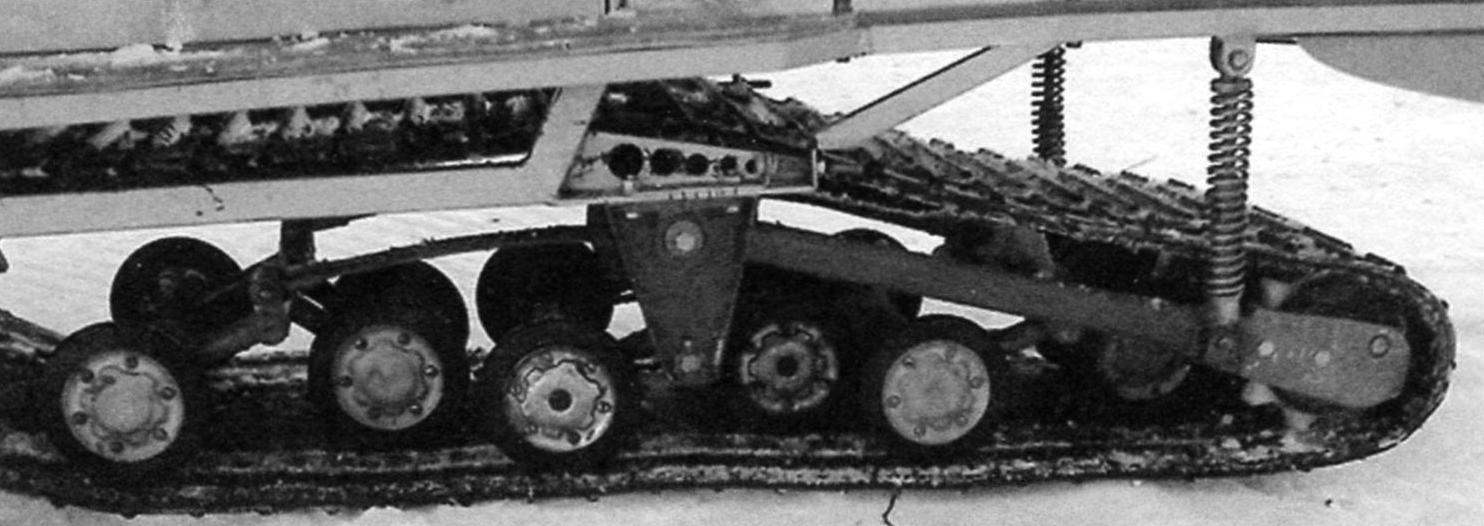

1 - caterpillar; 2 - drive gear wheel caterpillar (2 pcs.); 3 - a node of the drive shaft of the caterpillars; 4 - springs (2 pcs.); 5 - Balance Block Bracket (2 pcs.); 6 - Tension axle pendulum lever (2 pcs.); 7 - tension gear wheel caterpillar (2 pcs.); 8 - reference roller (10 pcs.); 9 - extreme trolley (2 pcs.); 10 - middle trolley; 11 - axis of the balancing unit; 12 - supporting rink (2 pcs.); 13 - housing with the bearing axis of the balance block (2 pcs.); 14 - Spring mount bracket to the axis of the balancing unit (2 pcs.)

The tracked block (more precisely is its longitudinal half) borrowed from the old industrial snowmobile "Buran". Why half? Yes, because, first of all, is easier. Secondly, the costs and easier design. Well, thirdly, it was assumed to ride not in a snowy virgin, but in the footsteps of "pioneers".
However, in combination with a couple of fairly wide ski, the snowmobile confidently overcomes deep drifts, and freshly fallen "muffles".
The extreme trolleys are redesigned - the springs are removed, and the bushings are cooked with each other, as the carts balance themselves, sitting on their axis at the ends of the springs.
Transferred and caterpillar tension knot. The front ends of its pendulum levers are sitting on a common axis with a spring balancing knot, and the rear is suspended on homemade spring shock absorbers to the frame.
Snowmobile propulsion - a rubber caterpillar width of 380 mm (on "Buran" there are two of these). The drive of the caterpillar is carried out from the drive shaft through a pair of 9-teeth "Buranovsky" of the heading wheels. Drive shaft - tubular. As noted earlier, it is made from the back tracked "Buranovskaya" axis, installed in 80205 bearings, the housings of which are attached directly to the upper frames of the frame. The caterpillar tension is carried out by a tensioning axis with gear wheels (the same as driven) after a couple of pendulum levers planned on the axis of the balancing trolley (moving its bearings along the frames of the frame). The caterpillar stretch shaft (or rather - the axis, since this item does not transmit torque) with gear wheels, too, "Buranovsky". The contact of the caterpillars with an expensive length - a little more than a meter.
Previously, the drivers built with a reference skillet. They are good on the "Pukhl" snow and snowdrifts, but very sensitive to solid irregularities of the road. From them - not only is transmitted to the driver discomfort, but there are breakdowns of the tracks and even the Scolation itself. Therefore, this time I decided to make a propeller with a rubber caterpillar and support rollers, as it assumed to ride the rolled snow and even ice.
Snowmobile transmission, which is called, it does not happen easier, although not without raisins. It consists of a single-stage chain transmission from the "IZH" motorcycle in 15.875 mm with a pair of stars: the presenter has 15 teeth, driven - 21, that is, the gear ratio is 1.6. The secondary (output) shaft of the power unit is lengthened by the pipe with the inner slots on the shaft on the shaft and the slot tip on the other. The free end of the extension agent is installed in the 80205 bearing, the housing of which is fixed on the M-shaped bracket, welded to the frame. On this tip through the adapter with the internal and external slots put the leading chain transmission starf. The driven star is planted (also through the slotted adapter) on the slotted tip of the drive shaft of the caterpillars. Adapters made from gear: calved, focused, spinned. Thanks to the slotted adapters of the stars (and, consequently, the gear ratio) is easy to change even in the field conditions under road conditions (more precisely, the density and depth of the snow cover).
Snowmobile controlled skiing - homemade, 900 mm long (blank - 1000 mm) and 200 mm width. Made of steel sheet 2 mm thick. Stamped pollows: in the middle - triangular groove, and along the edges - grain-grains, underground bent up (contact surface with snow - 800 mm). The longitudinal ribs of the stiffness of the P-shaped section were welded from above, and the ears and eyeles for fastening the suspension knots are welded, and there are ahead of the 3-mm rod ahead.
Each ski has a suspension consisting of a shock absorber (from the "Tula" motorol) and the self-made lever from the square of the square section 20 × 20 mm.
Steering - mixed type. The steering wheel itself is a motorcycle lever, and the rest is like a car. The steering shaft is a "turning" with a cardan hinge and even a kind of steering mechanism. "The turning point" did it because he did not enter the "parallel" with a pivot sleeve (and in general, straight shaft is better). It should be noted that the lower end of the shaft structurally turned out to be ahead of the swivel levers and the tag, and the sump is directed backwards. With this position, when turning the right, the steering wheel was needed to turn left, and vice versa, which contradicted common sense. Therefore, I had to enter the steering mechanism, which serves to coordinate the rotation of the steering wheel and the direction of skis. The mechanism is a pair of identical gear in the case. The leading gear by means of a slotted connection is attached to the end of the steering shaft, and the shaft of the driven gear is connected (welded, although this node is expedient and it is not difficult to make it too collapsible) with a T-shaped compound. From the bump through the steering thrust and swivel fists, the ski turn is simultaneously turning into the same direction, which steering wheel rotate.
Equipment. The fuel tank is welded from two tanks from the mopeda "Riga".
The seat - from the Minsk motorcycle is mounted on racks with a dryluminous sheet. Under the seat is a tool box, and between the drawer and the floor - a free niche with a hole behind. She lay in her if necessary for skiing, shovel and other long items. The hood is the redesigned front of the stroller (side trailer) of the Java-350 motorcycle. Electrical equipment regular. Headlight - from the Minsk motorcycle.

1 - poloz; 2 - amplifier; 3 - a handling; 4 - Introduction of the shock absorber; 5 - Cutting the lever


1 - steering wheel (cycling); 2 - the upper knee of the steering shaft; 3 - Bracket support for the top knee of the steering shaft (setting); 4 - Cardan hinge; 5 - steering column; 6 - the lower knee of the steering shaft; 7 - the clamp of the slotted connection of the lower knee and the shaft gear; 8 - leading shaft gear; 9 - slave shaft gear; 10 - Cup; 11 - bay axis and steering; 12 - steering thrust (2 pcs.); 13 - tip of adjustment of the length of the steering thrust (2 pcs.); 14 - locknight 15 - steering lever (2 pcs.); 16 - axis of thrust and lever (2 pcs.); 17 - swivel fist (2 pcs.)

1 - receiving nozzle; 2 - body; 3 - silencer; 4 - exhaust pipe


1 - drawn; 2 - cross; 3 - Bracket-Ushko (2 pcs.); 4 - thrust (2 pcs.); 5 - ski (2 pcs.); 6 - body; 7 - Rack (10 pcs.)

Sanki trailer - homemade. I believe that it is better to have small sledges than a big trunk on a snowmobile: if somewhere stuck, then sledges can be chopped up, the way to protruding and attach again. The body was once a hull of the side trailer of the Motorcycle "Java-350", or rather what remained from him after the manufacture of the hood for the snowmobile itself. His rooted, cutting around 200 mm in the middle. Then I slag the front and rear parts with exhaust ripples. Under the body posted a few cross-line from the pipe of a rectangular section of 40 × 20 mm, one of the wide walls of which left as the ears at both ends. The ears attached to the sidewalls of the body with exhaust ripples.
The body is mounted on skis from aluminum panels of the electrocontruction by means of tubular squares of a square section 20 × 20 mm. Racks at the top are welded to crossbars with ears and below - to "heels" - steel square plates with a thickness of 2 mm. "Heels" rushed to the clam of skis all the same exhaust ripples.
I want to note that the drawings of the nodes are working, and familiarizes: some are not all sizes (for example, frames), somewhere can not coincide, as the drawings were made on the finished design.
But in general, I believe that the manufacture of the design according to the drawings is already production, and not creativity.
V.Sirnov, P. Syava, Nizhny Novgorod region.
Instruction
First follow the sketch of the intended design. At the same time, refer to the two components of the device: led and leading. The first must consist of polozov, steering column and. The second part must contain a power plant, frame, drive and driver seat. However, if necessary, you can change the design, more adapting it to the implementation of the alleged tasks.
Determine the parts and aggregates of the snowmobile that you cannot do yourself. Check them and approximate the location of the aggregates on, the size of the structure and its individual parts. Approaching the layout professionally, make the plasp - a snowmock of a natural value of plywood or dense cardboard. Make the layouts of all purchased parts, the layout of the frame and collect from this plas. After determine the size and location of parts that are supposed to be made on your own.

Independent framework of the frame involves the mandatory presence of pipe bending, welding equipment and appropriate skills. If all this is not, order the manufacture of the frame in the nearest workshop on the pre-drawn drawing. Make a frame yourself start from the selection of necessary pipes. Pipes removed from motorcycle frames prefer to plumbing. Special frame tubes are usually more durable.

Bend the pipes on the way it is necessary. Before collect the frame, connecting the details of point welding. Perform a preliminary fit of the frame elements and the snowmobile details attached to it. This will avoid errors in design. Conduct the final welding of a single seam, preferably without breaks and other flaws. We weld the engine mounting brackets, a wheel drive, seats, steering column and other parts.

MAKE MAKE in the form of two wide skis. Wellect the steering column and secure it with the use of scaby connections on it. A more complex option involves the use of shock absorbers in ski suspension. If the design of the snowmobile provides for widespread front ski, then the lever from the "Ural" are more suitable as shock absorbers. Directly on the steering wheel, secure the controls from any motorcycle model.

In the second part of the snowmate, secure the engine and gearbox. They also take from any light motorcycle. As a rear wheel (or wheels), apply low pressure tires for self-making. They can be made of suitable rims and pneumatic chambers of automotive tires. In the inflated state, they will be good low-pressure wheels. For movement on loose snow, snowmates are required, located along all circumference wheels (wheels).
If the snowmobile design assumes the presence of one rear wheel, perform the rear suspension by a motorcycle sample. To do this, in addition to the frame, weld the rear pendulum and attach it to the frame through the hinge. Using motorcycle shock absorbers, make a pendulum suspension. Think over and install the chain drive from the engine to the rear wheel. After fitting the drive, install the rear wheel.
If you wish, install two rear wheels, attach the leading bridge of a shortened type to the back of the frame. For this purpose, find the rear axle from the Anti-Truck Muchotrier or yourself roaming the bridge from the passenger car. When using soft low-pressure wheels, the need for rear suspension partially disappears. The use of motorcycle shock absorbers technically complicates the task. The use of car-type shock absorbers will not make the suspension soft, as they are designed for much greater weight than a snowmobile.
With the arrival of winter two-wheeled transport, some people successfully replace on homemade snowmobiles. This technique is able to overcome large drifts and it is convenient to move on it on snow-covered roads. It costs it expensive and not everyone can afford it to acquire, so many collect snowmobiles themselves with the use of girlfriend.
General Snowmobile Device
Snowmobile is a sleigh that work with the help of the engine. They are movable, turning and able to develop speed over 85 mph. The middle class technique can overcome the lifts at 20 °. Steep slopes up to 65 ° are able to undergo snowmobiles with a higher class. General Snowmobile device:
- Technology management occurs by steering handles. The handles are connected to skiing that stand ahead.
- The steering wheel is equipped with drives: gas and brakes. With the help of these levers, the speed and inhibition of snowmobile is regulated.
- The rear wheels are missing, and a solid rubber tape (tracked) is installed instead, which moves the snowmobile. Through the chain and the belt, it is associated with the engine.
- Some models can be made on the chambers from the tractor wheels.
Thanks to its design, snowmobiles overcome difficult places that are not capable of passing cars. With their help, products in the snow-covered areas, in which there are no roads. But most people are used to using them for entertainment.
Production of structural elements
Before proceeding with the manufacture of structural elements, prepare the drawing required by materials and tools. You can take ready-made drawings based on snowmobiles bullfinch or boar. From the tools you will need:
- welding machine;
- pipe bender or ready frame;
- a hammer;
- screwdrivers.

Since the design of the miniscipment is low, the seat is made durable from the waterproof material. Tank for fuel is made of metal. Its volume should be from 10 to 15 liters. You can use a motorcycle chain as a drive.
How to make a snowmobile caterpillar
Snowmobile caterpillar is created from tires or conveyor belt. The work will be complex and time consuming if tires are used as the base. It is cut out of them, therefore, a sharp shoe knife or electric jig is required to work. To facilitate the process, tires are selected with a suitable tread pattern. Making homemade caterpillar:
- Safety from the tire is cut with a knife. If the blade of the knife is periodically cleaned in the soap solution, the cutting process becomes easier. When using electric jigsaw installed a blade with small teeth and wetted with water.
- If when cutting the track turned out to be solid or from the wrong side, extra layers were formed, they were also cut off.
- Cutting a new structure is made when the tread pattern occurred. The design made must be cling to the soil, so the structure of the figure should be correct.
With the onset of the winter period, two-wheeled vehicles lose their relevance. The use of a car to overcome small distances with high snowlessness is not particularly practical, but in most cases it is an impossible process. Where much better with this task is coping with a snowmobile.
Winter mechanical vehicle In most cases, it is equipped with a caterpillar rear-wheel drive and front steering skiing. High patency, versatility and simplicity of use make snowmobile to date the most popular vehicle in the winter season.
Features of homemade snowmobiles
You can buy a snowmobile in our time in any motosalone, both a large megalpolis and a small town, however prices of this technique forcing many winter ride lovers to make homemade snowmobile on the caterpillars with their own hands.
You can highlight the four important advantages of your own vehicle performed above the factory:
- The price is the most important factor for most. The cost of some aggregates of leading manufacturers of motorcycles can exceed the cost of 5-10 times assembled from undergraduate materials.
- Parameters - Ability to assemble a means of movement of the desired configuration. This applies to both the appearance and power supply, type of chassis, etc.
- Reliability is the point that even known manufacturers can always boast of products. With independent manufacture, a person uses the highest-quality materials and pays special attention to the most important nodes of the mechanism.
- Use - the ability to use materials, details and devices from other devices that ran in garages and subsidies.
At the same time, homemade snowmobiles find their use, both on the streets of populated areas and on road-free areas of country divisions and ski resorts.
Homemade snowmobile on the caterpillars with their own hands: where to start?

1 - rear lamp; 2 - trailed device; 3 - body (plywood, S16); 4 - side cataphoths; 5 - rear shock absorber (from the motorcycle "Dnipro", 2 pcs.); 6 - gas tank (from the start of the T-150 tractor); 7 - seat; 8 is the main frame; 9 - electronic ignition switch (from the "Sunrise" motorcycle); 10 - ignition coil (from the "Sunrise" motorcycle); 11 - power plant (from motoclaska, 14 hp); 12 - silencer (from motorcycle); 13 - steering column; 14 - steering hinge in a leather case filled with lubricant (hinge from "UAZ"); 15 - limitant vertical movement of the steering wheel skiing (chain); 16 - Rule Ski Rule Limiter; 17 - steering ski; 18 - Skying (2 pcs.); 19 - generator; 20 - clutch lever (from motoclaska); 21 - drive chain shield; 22 - footboard; 23 - the drive chain of the drive shaft; 24 - the leading shaft of the caterpillars; 25 - lower guide chain chains (polyethylene, S10, 2 pcs.); 26 - Caterpillar chain (from the header of the forage harvester, 2 pcs.); 27, 31 - upper front and rear guides (polyethylene S10, 2 pcs.); 28 - shock absorber of the hinge frame of the propulsion (shortened rear shock absorbers of the Dnipro motorcycle, 2 comp.); 29 - reference ski; 30 - rear frame spacers; 32 - rear axle.
The drawing of the homemade snowmobile is the most important stage at the preparatory stage of manufacture. Here to help we use engineering skillsBut in the absence of those there are surface sketches, creating a general image of the future mechanism.
Before creating a drawing, it is necessary to determine the list of required components. The basis of the standard configuration snowmate is:
- Rama - Depending on the complexity of the design, it can be borrowed from a quad bike, scooter, scooter, motorcycle, etc. In the event of their absence, the part is usually cooked from metal thin-walled pipes with a diameter of about 40 mm.
- Seat - Given the difficult operating conditions of the equipment, the material of this element should have a high moisture-repellent ability.
- The engine is selected with the calculation of the required velocity and total weight of the vehicle. Most often used motorboards, scooters, motorcycles, etc.
- Tank - 10-15 liter metal / plastic container will fully provide carefree trips to relatively distant distances and will not take a lot of space on the unit.
- Skiing - in the absence of ready-made options, it is recommended to use nine / ten-layer plywood sheets with a thickness of about 3 mm for independent manufacture.
- The steering wheel is chosen with the calculation of convenience and practicality. Like the frame, the engine and the seat is removed from the specified two-wheeled units.
- The drive is a detail transmitting torque from the engine to the caterpillar. This feature is well performing a motorcycle chain.
- Caterpillar is the most complicated and important element. About their species and ways of independent making it will be on.
How to make homemade caterpillars?
One of the most common materials manufacturer's manufacturer at home is car tire. A homemade caterpillar for a snowwave car has over other options one important advantage - it is made in the form of a closed contour, which significantly reduces the probability of break.
The side of the tire is separated by a shoe knife, after which a flexible treadmill remains. The drive canvas are attached primatela - painted along plastic pipes with a diameter of about 40 mm and a thickness of about 5 mm. Cropped under the width of the tires, halfwalls are attached to the canvas using bolts (M6, etc.) with an interval of 5-7 cm.
Immediate caterpillars are made by the same way. from the conveyor belt. Their main advantage is the ability to select the length of the propulsion. After circumcision under the required length, special attention should be paid to the coupling. The ends of the ribbon are superimposed on each other by 3-5 cm, and they are fixed across the width of the same bolts as the primer.
Make homemade caterpillars often help such girlfriend materials like wedge belts. Bonded in width with the help of soils, they constitute a full-fledged tracked canvas with depressions already existing on the inside.
Please note that the wider the caterpillar, the better the patency of the snowmobile, but worse its handling. Factory options have three samples of widths of cloths in inches: 15 - standard; 20 - wide; 24 - superwatch.
Go to practice
The frame made of pipes or corners is primarily equipped with a steering mechanism. Selecting the height and angle of inclination, weld the element with point welding. Install and fix the engine according to the drawing, paying attention to the absence of a strong inclination. Snowmobile should not have a long fuel line, so try to locate the tank closer to the carburetor.
The next step is the caterpillar installation. The driven bridge with a rowed blade attach the back of the frame (on the plug, suspension, shock absorber, etc., depending on the type of construction), presenter - in the middle side of the snowmobile (most often under the driver's seat), as a short curle with the engine. The gears of both bridges are connected before.
Motoblock homemade snowmobile

This transformation today is particularly popular. The motoblock can be used, both partly and completely. In the first case, the carrier frame with the rear axle is ventilated to the aggregate (engine with a steering fork and wheels). The most difficult stage at the same time the conversion of the working shaft of the motoblock into the drive gear is becoming.
The homemade snowmobile from the motoblock with partial use of parts is more versatile. In this case, only the engine and the steering fork are withdrawn from the donor, to the bottom of which skis are attached instead of wheels. The motor itself can be located in the back of the design.
It should be noted that the engines of the main part of the motoblocks are calculated on the weight and pressure of the wheels, which are several times less than the caterpillar. Therefore, in order to avoid elevated wear of parts and fuel consumption, such a snowmobile is better equipped with low pressure wheels.


