Force aggregate homemade quad bike He became a motor from the "Oka" - 32-strong, two-cylinder, four-stroke, liquid cooling. And if for the car its power often turned out to be not enough, then for quad bikes should have been enough with interest.
And this is just a dream of every man !!! I want this !!!
Frame of homemade quadrocycla - Spatial, welded. Its main elements (two pairs of spars: the upper and lower) are made of round tubes of type VGP-25 (water-based diameter of 25 mm with a wall thickness of 3.2 mm), auxiliary (so-in, crossbar, etc.) - from WGT-20. Spars - bent: the lower in the horizontal plane, the top - in the vertical. Flex a pipe on the pipe bender, "on the cold". The eyeles (pairs of ears) for fastening the levers and shock absorbers of the suspension welded to the frame immediately, and various brackets - as nodes and aggregates (by "place").
Homemade Quad bike all-terrain vehicles:
1 - front wheel (from the Chevrolet-Niva car, 2 pcs.);
2 - engine (from the car "Oka");
3 - transmissions of the front wheel drive;
4 - transmission box (from the car "Oka");
5 - transmissions of the rear wheel drive;
7 - rear wheel (from the Chevrolet-Niva car, 2 pcs.);
8 - fuel tank (20-liter canister);
9 - rear trunk;
10-blower;
11-Sprinkle Passenger Support (headrest from the "Oka" car);
12 - saddle;
13 - clutch basket (from the "Oka" car);
14 - lever fixing gear;
15 - body kit (fiberglass);
16 - steering wheel (from the motorcycle "Ural");
17 - instrument shield (from the car "Oka");
18 - Front Trunk
Transmission homemade quadrocycla - peculiar. Although the machine is all-wheel drive, but there is no dispensing box. As you know, the engine is located in the "Oka", and on the Quad bike it is set along. This allowed to direct the output shafts from the transmission change box (CAT) not on the right and left wheel (both in the car), but on the front and rear axle. Here is just the power unit itself, the clutch and gearbox, signed with the "basket" of the clutch and the checkpoint, had to move relative to the longitudinal plane of symmetry slightly left to reduce the horizontal angle of longitudinal swivels of transmissions. Well, their vertical angles were insignificant.

Transmission from the aggregates of various domestic cars, mainly "VAZ" models. But the finished industrial aggregates also had to refine. For example, from the PPC (from Oki) to ensure optimal (reduced) speed and increase the torque removed the main gear pair and replaced it on the chain transmission. The shifting stock also made another - extended, with releases on both sides of the checkpoint. The rod can be recorded in three positions: to include the 1st and 2nd gear, 3rd and 4th and rear. The selection lever of these provisions is on the right side, and the speed switch lever is with the left.
Intercolese gearboxes - from the rear bridges of the Vazovskaya "Classics", only their semi-axes together with the "stockings" are removed and replaced with shafts with shurthers from front-wheel drive models. Shruses as hinges are used in the remaining intermediate trash shafts.

Cinematic transmission scheme of self-made quadrocycle from Oka
1 - Motor (from the car "Oka");
2 - grip (from the car "Oka");
3 - gear change box;
4 - Sls (from car VAZ-2108, 12 pcs);
5 - gearbox of the main transmission with differential (from VAZ-2105, 2 pcs.);
6 - shaft (from car VAZ-2108, 6 pcs.);
7 - Wheel (from the Chevrolet-Niva car)
There are no reduced gears and blocking differentials.
Steering - motorcycle type (lever and shaft) at the top and automotive type (with steering rods) - downstairs, just simplified, without a steering mechanism, with one piece. The steering wheel first used from the Minsk motorcycle, with a pipe diameter of 22 mm, but it turned out to be a bit thin. Later found and set from the "Ural" motorcycle. The steering shaft is from the pipe with a diameter of 20 mm and a thickness of the wall of 2.8 mm. At the bottom end, it has a stroke limiter. At the bottom of the shaft rests on the stubborn bearing, and in the middle part turns into the junction of the piping bracket-sleeve.
The sump is made of a steel sheet with a thickness of 8 mm in a form resembling the letter "T". The edge of the "racks" performed a hole with a diameter of 20 mm - the steering shaft is inserted into it, and in the ears - the tapered holes under the ball tips of the steering. These holes are enhanced by suitable welded washers. The bark ears are slightly bent down so that they are almost parallel to the traction.
The wheels are 15-inch, from the car "Chevrolet-Niva". Tires with an appropriate planting diameter of 205/70 (width / height as a percentage of width) with off-road tread pattern. The diameter of the wheel running is about 660 mm.

Framework of the homemade quandercike frame:
1 - Lower spar (pipe D25x3,2,2,2 pcs.);
2 - upper spar (pipe D25x3,2,2 pcs.);
3 - Rack (pipe D25x3,2, 2 pcs.);
4 - support of the rear top lever suspension (pipe D25x3,2,2 pcs.);
5 - rear pitch (pipe D20x2.8, 2 pcs.);
6 - support front top lever suspension (pipe D25x3,2, 2 pcs.);
7 - front pitch (pipe D20x2.8, 2 pcs.);
8 - upper support front shock absorber (35 × 35 corner);
9 - top shock absorber top support (sheet S5, 2 pcs.);
10 - Front engine mounting rack (sheet S3, 2 pcs.);
11 - Rear reference rack of engine mounting (sheet S3,2 pcs.);
12 - eyelets of fastenings of levers and suspension shock absorbers (sheet S5, 18 pairs);
13 - Bracket fastening the saddle (sheet S3, 2 pcs.);
14 - upper transverse connection (pipe D20x2.8);
15 - lower transverse connection (pipe D20x2.8.2 pcs.);
16 - radiator support (pipe D25x3.2 cut along half, 2 pcs.);
17 - front console footboard (pipe D20x2);
18 - rear console footage (pipe D20x2);
19 - Communication of the front and rear consoles of the footboard (pipe D20x2);
20 - crossing the steps (sheet S5, 4 pcs.);
21 - UCHO fastening of fiberglass kit (sheet S5, set)
Suspension wheels - independent, on two triangular transverse levers each (upper and lower) with shock absorbers from the "Oka" car (front). The levers are welded from round tubes of type VGP-20. Elastic elements (springs) and shock absorbers - from the "Oka" car (rear). In the wheels of the front levers they weld the hubs and swivel fists - from the car VAZ-2109. And those and others had to modify. In the hubs installed studs under the wheels from "Niva", and in the front fists - home-made swivel levers.
The muffler is homemade, two-piece. To protect against temperature storage boxes, covered with a remote cover, and insulated asbestos inlet.
Body body kit - fiberglass. He shouted it for the first time, and therefore first examined the recommendations for the implementation of the relevant work. But as it turned out, this process is painstaking, although the result is worth it.

Levers suspension wheels
(A - the upper arm of the front suspension; b - the lower arm of the front suspension; in the bottom lever of the rear suspension; G is the top lever of the rear suspension; all parts, except marked, are made of pipe VGT-20):
1 - beam (2 pcs.);
2 - cross;
3 - sleeve (pipe D37x32, 2 pcs.);
4 - dressing of the shock absorber (steel, sheet S3);
5 - ball hinge (from the steering thrust of the car "Zhiguli")
At first, it was made of a steel square pipe with a cross section of 10x10x1mm. Required body contours. Fortunately, this pipe is easily neat even with his hands through the knee. The contour welded to the frame with the help of jumpers from the same pipe, in places where then (after dusting of the kit), it would be possible to cut the "tape". Then, bent from an organity (wood-fiber plate) "Wings" and fixed them with self-draws to the contour and jumpers. Where the bend was obtained steep, fastened individual strips from the same organity. The front ended with a neopolistir acquired in a shopping store. It was possible to use foam or the same mounting foam, but the polystyrene foam turned out to be a more appropriate material - it is well cut in a sharp thin knife. Separate elements of it glued into the overall design on the mounting foam.

Steering column assembly:
1 - steering shaft (pipe D20x2.8);
2 - steering connection plate (steel, sheet S6);
3 - plate plate (steel, sheet S6, 2 pcs.);
4 - Rubber Bracket Sleeve Steering Shaft (Capron, S18 Sheet);
5 - Support washer (steel, sheet S6, 2 pcs.);
6 - Cup (steel, sheet 18);
7 - steering wheel limiter (steel, S6 sheet);
8 - Bearing hull;
9 - stubborn tip (steel, circle 15);
10 - Thrust Bearing
Filshbak - complex shape. It did not seem to be taken out of the organity. Therefore, by climbing the engine with a plastic film, it began to fill the places of the mounting foam intended for it. After each layer is a mandatory drying, otherwise the thick volume of the foam may not dry inside. Filled until the layers went beyond the contour. Finally, after complete drying, the foam became a knife to withdraw the desired shape. The verge burned down coarse sandpaper. 
Under the instrument panel went into the course of the dashboard "Oka". I fastened it on the blank, too, using a mounting foam. Since foam is a large, pores filled with plaster and then processed. When the shape of the blanks began to answer the intended design and its surface became more or less smooth, covered the workpiece of PF-115 paint. Since I was not going to make the matrix on the nerve for dusting of the kit, and immediately soldered the bodywork on it, followed by the end of the surface to the perfect state, then the shpocking of the plaster and the painting of the nerve could be neglected.

Quad bike from the store - the pleasure is not available to everyone. Therefore, many craftsmen make quadrics with their own hands. And in this article we will tell about the most interesting of them.
In the manufacture of quad bike, everything can be useful in the garage and nearby. Each vehicle made with their own hands is unique and individually, so the drawings and schemes have to talk with difficulty.
Few people describe in detail the process of building their offspring, from this to find specific information is extremely difficult. But there are exceptions.
How to make quad bike do it yourself
in 2012, the talented designer S. Plentnev shared the drawings and nuances of the construction of his brainchild.
What was used in the design of the TC:
- Front and rear wheels from Niva Chevrolet 15 inches
- Engine A-M Oka
- Box gear
- Intercolese gearboxes from the rear bridges of the Vazovskaya "Classics"
- Slusa from car VAZ-2108, 12 pcs
- Fuel Bakis Canisters for 20l
- Emphasis Passenger Oki Headrest
- Clutch from Oka.
- Steering wheel from the motorcycle Ural »
- Instrument shield from car
The main technical specifications of the Quadrocyclaus:
Quadrocycle drawings:


Transmissionideno from AvtoVAZ nodes with some modifications. For example, a loyal to reduce speed and increase the torque instead of the main pair, a chain transmission was used.
Intercolese gearboxes are borrowed from the classics, the semi-axes are removed and replaced with shruses from the front drive of the VAZ. Also, the joints of equal angular velocities are used in other nodes of transmission.
Pendant independent on triangular crossings. Shock absorbers from Oka.
Silencer homemade of 2 sections, isolated asbestos.
The kit is made of fiberglass. 10kg epoxy resin took to create such plastic, 1kg of the plasticizer and the same hardener. 15 meters of fiberglass and 5 meters of glassmate.
Body body kit - fiberglass. He shouted it for the first time, and therefore first examined the recommendations for the implementation of the relevant work. But as it turned out, this process is painstaking, although the result is worth it.
Bumper and kenguryatniki cooked from a 20mm round-profile pipe.
Photos of finished quad bike:


Article-based material: http://modelist-konstruktor.com/razrabotki/853
Quad bike from motorcycle
This quadric is made on the basis of the Ural motorcycle.
All details in the video.
Quad bike with Motor IL Jupiter. Distribution from the motorcycle ant.


Quad Cobra Mix
Generator, Forced Cooling, Radio, Electrostarter from dozens, Engine from the Ural motorcycle.


Video homemade quadrocyclas in action:
Homemade Buggy "Raptor"


Homemade Quadrocycle with an engine from Oki
Quad bike - actually any four-wheel transport, because in the Latin Quadro - "Four", on the SIS expanses under this title most often implies a all-wheel drive representing a motorcycle and car symbiosis. From the motorcycle, the quad bike adopted mobility, maneuverability, ease, speed, and from the car - the excellent characteristics of passability, power and controllability. As a result, it turned out a unique vehicle intended for various purposes.
The domestic market provides only foreign models of quadrocycles, the cost of which is often translated. At the same time, on the secondary transport market without difficulty, it is possible to find used motorcycles and cars at an extremely low price.
For example, the "Ural" motorcycle is large, bulky, heavy and "voracious" has a wonderful four-stroke engine with rear transmission and worth "penny". For this reason, enthusiasts are much cheaper and more interesting to create their own structures of these SUVs.
A typical factory representative of quad bikes is a brilliant, neatly assembled, strong and powerful.

His homemade fellow, which is a little inferior to externally, and in terms of power - and suppressed.

How to make quad bike do it yourself
Before starting the assembly, you need to make a detailed list of units and parts that will be needed to create your own brainchild, develop a work plan and drawing.
Engine: optimal choice
It is logical that first of all it is necessary to find the "heart" of the future "beast" - the power unit. It will suit absolutely any, starting from the usual motoblock and ending with six-liter V12 - there are such precedents. In most cases, motorcycle engines are used - they are economical and small-sized.
.jpg)
To use high gear numbers in normal operation, the engine "Minsk" or "Urals" will be enough. In the summer there is a question of overheating, so the models with air-cooled should be selected. Another good option is the opposite engines of Soviet production, an indisputable plus of which - a powerful traction and a completely unpretentious cardan transmission.
Suspension: Rear and Front
There are two most common rear suspension solutions for a quad bike.
- Reducer-cardan system. The design is obtained as easier and simple as possible, but there is no differential than, in principle, you can sacrifice the sake of previously mentioned advantages.
- Using a car bridge. The design is extremely severe, and if there is no desire to have a quad bike with a car base, you need to shorten the bridge, which is a very nontrivial occupation. Of the advantages it is worth allocating only the presence of differential, which is useful when moving along the tracks.

Huge opportunities are revealed to create anterior suspension and steering. Quadzerickel suspension levers carry a much smaller load than automotive, respectively, they can be made independently, using remedies for this. The optimal option is the creation of the suspension on the basis of the existing Motorcycle "Ural".
Rama: drawings and alternative
The best solution is a robust design of pipes or profiles cooked with each other.

Ideal - to remove the frame from the donor motorcycle and draw the necessary elements - it eliminates problems, however, the design may be unnecessary.

Assembly of quad bike
After preparing the necessary tools, donor vehicles and freed time, you can start creating your own quad bike:

Thanks to a reliable design, a time-tested, excellent power and thrust, it is the "Ural" motorcycle is the most popular donor for homemade quad bikes.
Video clip: "OSA" 4x4
The video below describes the design of the self-made quad bike, its characteristics, properties and features.
Photo Overview
Photos of quadrocycles on the basis of domestic motorcycles and cars:
.jpg)
As you can make sure, using outdated and inexpensive achievements of the Soviet Auto industry, you can create stunning devices that will sweep your pride and satisfy most of the transport tasks.
A considerable number of offers on the Quad bike market for young drivers allows you to choose a modification with different characteristics and for any wallet. If you are not ready to spend an impressive amount for the purchase of an ATV, have a creative veil, minimal technical knowledge and some special skills, you can make a quad bike for a child with your own hands. Of course, you will need some tools.
On the Internet you can find many interesting ideas for a quad bike, perhaps you have your own ideas. The realization of them will certainly give you the enormous joy of creativity and will allow you to obtain the original quad bike with minimal financial costs.
How to make a quad bike for a child with your own hands
Children's quadrocycle can be made independently from old motorcycles and additional spare parts. The main thing is that the vehicle you make is safe - because we are talking about children! If you plan to use new details, then choose only high-quality, and used materials need the most critical assessment. This is especially true of the fastening components: bolts, screws, etc.
What will be required to create a children's all-terrain vehicle?
First of all - decide on the appearance of your unique quad bike and its size. You can make an off-road unit for a child of any complexity - everything depends on your knowledge and skills. If you do not want to spend months to create an electric wadrocycle, stop at a simpler design - in the future, as your child grows, it can be improved.

The basis of any vehicle - frame. The drawing of the ramp of children's quadrocycle is needed to observe the accuracy of the size of all design elements. Surely you can make a drawing yourself. If you assume the opportunity in the future strengthening and upgrading your quadrocycle, then the frame must have a good margin in the suspension. For a frame, you can use as a square profile of a suitable size (for example, 25x25mm), a pipe ¾ inch or the finished design from the donor model, it all depends on your desire, fantasy and opportunities. If the frame is made independently, pay attention to the quality of welding seams.
Wheels, brake system and steering system, shock absorbers - the next stage of the assembly of the quad bike for a child. Wheels Most masters recommend to select new - you can, for example, take the wheel to kart or even for the F320 MM garden car. If you make a quad bike for an older child, it will certainly want to drive on it off-road - then choose the wheels with a wide protector and buy stamped discs (albeit the simplest). This will increase the safety of the Quadrocycle and will allow the child to overcome serious obstacles.

The drive into two rear wheels for the children's quad bike from the electric motor of sufficient power through the gearbox (homemade or finished) is a good solution. The gas button on the steering wheel will delight your young driver and make a children's quad bike like this. The steering system is an important element that ensures the safety of a small driver and guaranteeing that it can easily manage its square.
Electro-wadrocycle with your own hands: Engine and battery
The battery and the engine for homemade quad bike are chosen based on the possibilities and needs of the driver. So, you can use a pair of engines from a Volga or a surnupture, take an electric motor from donor transport (for example, an electrical cucutor) or take advantage of its idea. The main thing is that the electromotor ensures sufficient speed for the child - the smallest enough and 5-8 km / h, the older children will need more speed, which means that the engine is more powerful.
As for the battery - it is important to establish it in such a way that there was no need to disassemble the entire design for recharging. The battery is suitable from a donor scooter, uninterrupted or another that you can find.
When all the main nodes are assembled, the time comes to be engaged in the appearance of the quad bike - after all, aesthetics are extremely important for the kid. Ideally, you can use body elements from the old non-working model of the children's quadrocycle, but your fantasy can tell you other original ideas.

Work on the assembly of an ATV will not only allow to get unique transport for little money. It will bring pleasure not only adults, but also the defector, as to make children's quad bike with their own hands - an exciting occupation, very interesting and useful for every man.
Editor
"Children's Quadrocycles"
New posts:
Children's Electricvadrocyclical EL-Sport Junior ATV 500W 36V / 12AH
| Speed: | 25 km / h |
| Power: | 500 W. |
| Power reserve: | 20 km | 60 kg |
| Weight: | 40 kg |
| Wheel diameter: | 13" |
| Battery: | |
| Charging time: | 6-8 hours |
| Suspension: | Front and rear spring |
| Drive unit: | Chain |
| Brakes: | Disk |
| Dimensions: | 1020 × 660 × 650 |
| Color: | Green, black and white |
| Additionally: | Wheel base 13x5-6 |
| A type: | Electrocvadrocyclical |
Price: 36845 RUB 29900 rub
Children's Quadrocyclick on the battery El-Sport Kid ATV 800W 36V / 12AH
| Speed: | 25 km / h |
| Power: | 800 W. |
| Power reserve: | 20 km | 60 kg |
| Weight: | 40 kg |
| Wheel diameter: | 13" |
| Battery: | SLA (lead-acid) 36V / 12Ah |
| Charging time: | 6-8 hours |
| Suspension: | Front and rear spring |
| Drive unit: | Chain |
| Brakes: | Disk |
| Dimensions: | 1020 × 660 × 650 |
| Color: | Orange |
| Additionally: | Wheel base 13x5 - 6 " |
| A type: | Electrocvadrocyclical |
Price: 37670 rub 34500 rub
Children's Electricvadrocycle El-Sport Children ATV 1000W 36V / 12AH
| Speed: | 25 km / h |
| Power: | 1000 W. |
| Power reserve: | 20 km | 60 kg |
| Weight: | 55 kg |
| Wheel diameter: | 13" |
| Battery: | SLA (lead-acid) 36V / 12Ah |
| Charging time: | 6-8 hours |
| Suspension: | Front and rear spring |
| Drive unit: | Chain |
| Brakes: | Disk |
| Dimensions: | 1020 × 660 × 650 |
| Color: | Green, Blue Spider |
| Age: | From 4 years |
| Additionally: | Wheel base 13 × 5 - 6 " |
| A type: | Electrocvadrocyclical |
Price: 43470 rub 37900 rub
MYTOY 500D Electro-wadrocycle
| Speed: | 35 km / h |
| Power: | 500 W. |
| Power reserve: | 35 km | 90 kg |
| Weight: | 70 kg |
| Material: | steel, Tubular |
| Wheel diameter: | 14" |
| Battery: | 48V (4x12V) / 20Ah |
| Brakes: | |
| Dimensions: | 1150x550x700. |
| Color: | Autumn camouflage, hip-hop, matte khaki, red |
| Shock absorbers: | front / rear |
| Age: | from 4 years |
| Additionally: | Electric engine, uncoolette, 500 watts built into the rear axle; A full-fledged rear axle differential; Speedometer with battery charge indicator. Front LED headlights. Turn signals; The remote control is at a distance of up to 50 meters; The ability to install automatic shutdown by 5-10 minutes; Speed \u200b\u200blimiter from 5 to 35 km / h; Reverse; Tires pneumatic rubber tubeless 14x4.10-6; Reinforced steering traction; Steering hubs on bearings; |
Price: 63000 rub
Electro-wadrocycle Mytoy 750E differential
| Power: | 600 W. |
| Power reserve: | 25 km | 100 kg |
| Weight: | 70 kg |
| Material: | Rama reinforced steel, tubular |
| Wheel diameter: | 16" |
| Battery: | 48V (4x12V) 20Ah |
| Suspension: | Independent front |
| Brakes: | Front / rear manual disk hydraulic |
| Speed: | Three speed limiters: the first speed: 7-9 km / h; Second speed: 12-15 km / h; Third speed: up to 25 km / h; |
| Dimensions: | 1400x760x900. |
| Color: | yellow camouflage, autumn camouflage, maple |
| Shock absorbers: | Oil |
| Age: | from 6 years old |
| Additionally: | Electric engine, unknown, 600 watt, built into the rear axle; A full-fledged rear axle differential; Speedometer with battery charge indicator; Headlight; Rear stop; Sound signal; Turn signals; Mirrors; The remote control is at a distance of up to 50 meters; The ability to install automatic shutdown by 5-10 minutes; Reverse; Tires pneumatic rubber tubeless 16x8.00-7; |
Price: 77700 rub
MYTOY 500D LUX Electro-wadrocycle
| Speed: | 30 km / h |
| Power: | 500 W. |
| Power reserve: | 35 km | 90 kg |
| Weight: | 70 kg |
| Material: | steel, Tubular |
| Wheel diameter: | 14" |
| Battery: | 48V (5x12V) / 20Ah |
| Brakes: | Hydraulic rear knob |
| Dimensions: | 1150x550x700. |
| Shock absorbers: | front / rear |
| Age: | from 4 years |
| Additionally: | Electric engine, uncoolette, 500 watts built into the rear axle; A full-fledged rear axle differential; Speedometer with battery charge indicator; Silencers speakers imitating the sound of the motor when pressed for gas; Front LED headlights; Turn signals; The remote control is at a distance of up to 50 meters; The ability to install automatic shutdown by 5-10 minutes; Speed \u200b\u200blimiter from 5 to 30 km / h; Reverse; Tires pneumatic rubber tubeless 14x4.10-6; Reinforced steering traction; Steering hubs on bearings. |
Price: 69300 rub
Electrobgga MYTOY 500W.
| Speed: | 30 km / h |
| Power: | 1000 W. |
| Power reserve: | 30 km | 60 kg |
| Weight: | 68 kg |
| Wheel diameter: | 13" |
| Battery: | 48V / 20AH (removable) |
| Brakes: | Disk hydraulic |
| Speed: | First 5-8 km / h; Second 15-18 km / h; Three 25-30 km / h |
| Dimensions: | 1330x810x930. |
| Color: | Red Blue |
| Age: | From 7 years old |
| Additionally: | Charging indicator; Safety belt; Gas Slow Pedal; Rear speed: (reverse); Adjustment of seating (forward, back); Steel frame, tubular; Front LED headlights; LED tape around the perimeter; 13x5.00-6 "(rubber, pneumatic, artless) |
Price: 82900 rub
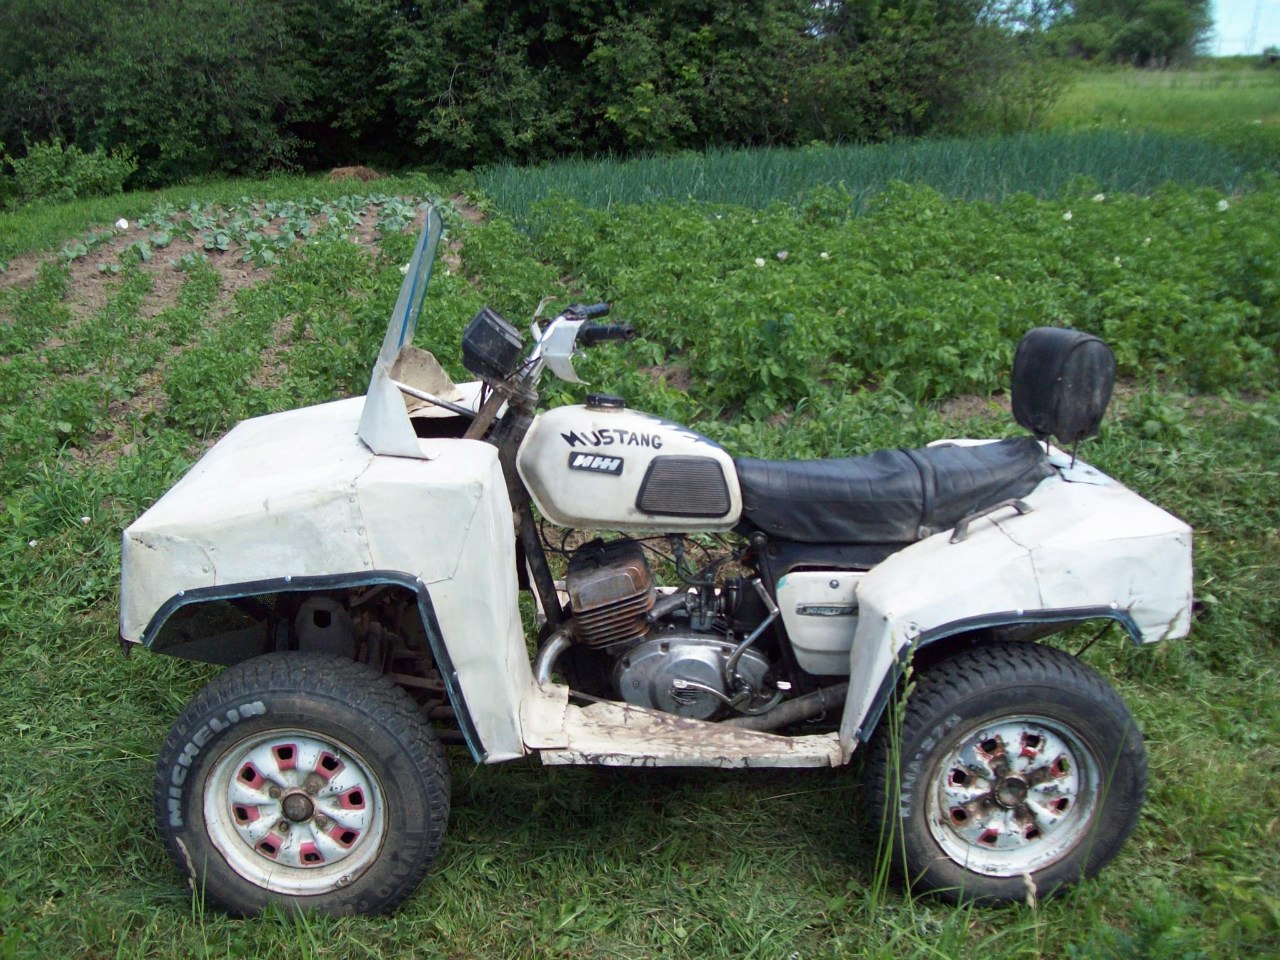
 Introducing the Quadrocycle of our permanent author S. Plentneva from the city of Points of Perm Region. The next car constructed indicates the increased design level and the professional skills of its creator. However, judge for yourself ...
Cow a year since then when having left the garage, tested its first quad bike with the rear leading wheels (). And the thought came: And now it is now all-wheel drive ATV (from the English. All Terrain Vehicle is all-terrain vehicle; such an international designation received similar cars).
Fortunately, at that time the buyer was turned up on Buggy (), and the revenue money went to the implementation of a new project.
 Labor is 3 - 4 hours after work and on weekends - and the new car was ready for testing, only small (and I would say pleasant) refinement: connecting light equipment, installing the ignition lock, rear-view mirrors and other little things.
The power unit for my quad bike was the motor from the "Oka" - 32-strong, two-cylinder, four-stroke, liquid cooling. And if for the car its power often turned out to be not enough, then for quad bikes should have been enough with interest.
Machine frame - spatial, welded. Its main elements (two pairs of spars: the upper and lower) are made of round tubes of type VGP-25 (water-based diameter of 25 mm with a wall thickness of 3.2 mm), auxiliary (so-in, crossbar, etc.) - from WGT-20. Spars - bent: the lower in the horizontal plane, the top - in the vertical. Flex a pipe on the pipe bender, "on the cold". The eyeles (pairs of ears) for fastening the levers and shock absorbers of the suspension welded to the frame immediately, and various brackets - as nodes and aggregates (by "place").

1 - front wheel (from the Chevrolet-Niva car, 2 pcs.);
2 - engine (from the car "Oka");
3 - transmissions of the front wheel drive;
4 - transmission box (from the car "Oka");
5 - transmissions of the rear wheel drive;
7 - rear wheel (from the Chevrolet-Niva car, 2 pcs.);
8 - fuel tank (20-liter canister);
9 - rear trunk;
10-blower;
11-Sprinkle Passenger Support (headrest from the "Oka" car);
12 - saddle;
13 - clutch basket (from the "Oka" car);
14 - lever fixing gear;
15 - body kit (fiberglass);
16 - steering wheel (from the motorcycle "Ural");
17 - instrument shield (from the car "Oka");
18 - Front Trunk
The transmission of all-terrain vehicles is peculiar. Although the machine is all-wheel drive, but there is no dispensing box. As you know, the engine is located in the "Oka", and on the Quad bike it is set along. This allowed to direct the output shafts from the transmission change box (CAT) not on the right and left wheel (both in the car), but on the front and rear axle. Here is just the power unit itself, the clutch and gearbox, signed with the "basket" of the clutch and the checkpoint, had to move relative to the longitudinal plane of symmetry slightly left to reduce the horizontal angle of longitudinal swivels of transmissions. Well, their vertical angles were insignificant.
 Transmission from the aggregates of various domestic cars, mainly "VAZ" models. But the finished industrial aggregates also had to refine. For example, from the PPC (from Oki) to ensure optimal (reduced) speed and increase the torque removed the main gear pair and replaced it on the chain transmission. The shifting stock also made another - extended, with releases on both sides of the checkpoint. The rod can be recorded in three positions: to include the 1st and 2nd gear, 3rd and 4th and rear. The selection lever of these provisions is on the right side, and the speed switch lever is with the left.
Intercolese gearboxes - from the rear bridges of the Vazovskaya "Classics", only their semi-axes together with the "stockings" are removed and replaced with shafts with shurthers from front-wheel drive models. Shruses as hinges are used in the remaining intermediate trash shafts.

1 - Motor (from the car "Oka");
2 - grip (from the car "Oka");
3 - gear change box;
4 - Sls (from car VAZ-2108, 12 pcs);
5 - gearbox of the main transmission with differential (from VAZ-2105, 2 pcs.);
6 - shaft (from car VAZ-2108, 6 pcs.);
7 - Wheel (from the Chevrolet-Niva car)
There are no reduced gears and blocking differentials.
 Steering - motorcycle type (lever and shaft) at the top and automotive type (with steering rods) - downstairs, just simplified, without a steering mechanism, with one piece. The steering wheel first used from the Minsk motorcycle, with a pipe diameter of 22 mm, but it turned out to be a bit thin. Later found and set from the "Ural" motorcycle. The steering shaft is from the pipe with a diameter of 20 mm and a thickness of the wall of 2.8 mm. At the bottom end, it has a stroke limiter. At the bottom of the shaft rests on the stubborn bearing, and in the middle part turns into the junction of the piping bracket-sleeve.
The sump is made of a steel sheet with a thickness of 8 mm in a form resembling the letter "T". The edge of the "racks" performed a hole with a diameter of 20 mm - the steering shaft is inserted into it, and in the ears - the tapered holes under the ball tips of the steering. These holes are enhanced by suitable welded washers. The bark ears are slightly bent down so that they are almost parallel to the traction.
The wheels are 15-inch, from the car "Chevrolet-Niva". Tires with an appropriate planting diameter of 205/70 (width / height as a percentage of width) with off-road tread pattern. The diameter of the wheel running is about 660 mm.

1 - Lower spar (pipe D25x3,2,2,2 pcs.);
2 - upper spar (pipe D25x3,2,2 pcs.);
3 - Rack (pipe D25x3,2, 2 pcs.);
4 - support of the rear top lever suspension (pipe D25x3,2,2 pcs.);
5 - rear pitch (pipe D20x2.8, 2 pcs.);
6 - support front top lever suspension (pipe D25x3,2, 2 pcs.);
7 - front pitch (pipe D20x2.8, 2 pcs.);
8 - upper support front shock absorber (35 × 35 corner);
9 - top shock absorber top support (sheet S5, 2 pcs.);
10 - Front engine mounting rack (sheet S3, 2 pcs.);
11 - Rear reference rack of engine mounting (sheet S3,2 pcs.);
12 - eyelets of fastenings of levers and suspension shock absorbers (sheet S5, 18 pairs);
13 - Bracket fastening the saddle (sheet S3, 2 pcs.);
14 - upper transverse connection (pipe D20x2.8);
15 - lower transverse connection (pipe D20x2.8.2 pcs.);
16 - radiator support (pipe D25x3.2 cut along half, 2 pcs.);
17 - front console footboard (pipe D20x2);
18 - rear console footage (pipe D20x2);
19 - Communication of the front and rear consoles of the footboard (pipe D20x2);
20 - crossing the steps (sheet S5, 4 pcs.);
21 - UCHO fastening of fiberglass kit (sheet S5, set)
Suspension wheels - independent, on two triangular transverse levers each (upper and lower) with shock absorbers from the "Oka" car (front). The levers are welded from round tubes of type VGP-20. Elastic elements (springs) and shock absorbers - from the "Oka" car (rear). In the wheels of the front levers they weld the hubs and swivel fists - from the car VAZ-2109. And those and others had to modify. In the hubs installed studs under the wheels from "Niva", and in the front fists - home-made swivel levers.
The muffler is homemade, two-piece. To protect against temperature storage boxes, covered with a remote cover, and insulated asbestos inlet.
Body body kit - fiberglass. He shouted it for the first time, and therefore first examined the recommendations for the implementation of the relevant work. But as it turned out, this process is painstaking, although the result is worth it.

(A - the upper arm of the front suspension; b - the lower arm of the front suspension; in the bottom lever of the rear suspension; G is the top lever of the rear suspension; all parts, except marked, are made of pipe VGT-20):
1 - beam (2 pcs.);
2 - cross;
3 - sleeve (pipe D37x32, 2 pcs.);
4 - dressing of the shock absorber (steel, sheet S3);
5 - ball hinge (from the steering thrust of the car "Zhiguli")
At first, it was made of a steel square pipe with a cross section of 10x10x1mm. Required body contours. Fortunately, this pipe is easily neat even with his hands through the knee. The contour welded to the frame with the help of jumpers from the same pipe, in places where then (after dusting of the kit), it would be possible to cut the "tape". Then, bent from an organity (wood-fiber plate) "Wings" and fixed them with self-draws to the contour and jumpers. Where the bend was obtained steep, fastened individual strips from the same organity. The front ended with a neopolistir acquired in a shopping store. It was possible to use foam or the same mounting foam, but the polystyrene foam turned out to be a more appropriate material - it is well cut in a sharp thin knife. Separate elements of it glued into the overall design on the mounting foam.

1 - steering shaft (pipe D20x2.8);
2 - steering connection plate (steel, sheet S6);
3 - plate plate (steel, sheet S6, 2 pcs.);
4 - Rubber Bracket Sleeve Steering Shaft (Capron, S18 Sheet);
5 - Support washer (steel, sheet S6, 2 pcs.);
6 - Cup (steel, sheet 18);
7 - steering wheel limiter (steel, S6 sheet);
8 - Bearing hull;
9 - stubborn tip (steel, circle 15);
10 - Thrust Bearing
Filshbak - complex shape. It did not seem to be taken out of the organity. Therefore, by climbing the engine with a plastic film, it began to fill the places of the mounting foam intended for it. After each layer is a mandatory drying, otherwise the thick volume of the foam may not dry inside. Filled until the layers went beyond the contour. Finally, after complete drying, the foam became a knife to withdraw the desired shape. The verge burned down coarse sandpaper.
 Under the instrument panel went into the course of the dashboard "Oka". I fastened it on the blank, too, using a mounting foam. Since foam is a large, pores filled with plaster and then processed. When the shape of the blanks began to answer the intended design and its surface became more or less smooth, covered the workpiece of PF-115 paint. Since I was not going to make the matrix on the nerve for dusting of the kit, and immediately soldered the bodywork on it, followed by the end of the surface to the perfect state, then the shpocking of the plaster and the painting of the nerve could be neglected.
 So, the Bolon is ready and to solder the quality product, it took: 10 kg of epoxy resin, 1 kg of plasticizer to it and 1 kg hole-callee, 15 robust meters of non-footwork fiberglass, 5 m of glass, brushes, gloves. It is very desirable to work in the means that protect the breath. And what they are more expensive, the more reliable. But the experience, as is known, can not buy, so it was gained in the process of work.
A transparent scotch used as a separation layer between the nerd and the product. Thoroughly, without skipping, glued to his stripes. There was only 1.5 rolls of wide scotch.
 Divorced a resin for 200 - 300 grams with a hardener and plasticizer. Applied measuring cups and syringes, which is not very convenient. Before that, cut the strips of fiberglass with such dimensions so that large cloths lay on the smooth surfaces, and on the irregularities, the sections of the fabric were able to repeat them without making folds. By the way, fiberglass to the measure stretches on the diagonal of the weave, "flowing" the desired form.
At first, one piece of nerve was smelled to thick epoxy resin, put the fiberglass on it and the resin was again impregnated from above. The neighboring piece of the cloth was glued by the same technology with a twist of 3 - 5 cm. Work had a spore - resin grabbed pretty quickly, and the higher its temperature, the faster. Yes, another resin has a slightly heated near the powerful lighting lamp for better flow.
After jumping a fiberglass in one layer, began to shock it with glassate. The glass made me quite thick, and they turned out to be good to dial the thickness of the product. But it does not fit irregularities, so I used it only on even (or with unrocked deflection) surfaces and without a twist. The impregnation of the resin was carried out in the same way as when working with fiberglass. It should only be noted that the resin for the impregnation of stiposate goes a lot, so it is necessary to breed it more. The uneven surfaces after the stickers of the stroke gambled into a few layers of the cloth. Each subsequent layer imposed after the previously gripped the previous one, so as not to break down the resin. And since the process of body cutting took no one day, after a day of the break "rough" the surface of large sandpaper and degrease - because the resin is completely cured during this time. The final layers over the mat again covered the glass kits, and not even one layer.

Trunks:
a - front; B - rear
Since I needed the surface, as they say, than it is even better, the better, and the experience was not enough, then the failures and pits still remained - poured them wherever one resin, and where and with the imposition of fiberglass pieces. The resins did not have enough. I did not buy in Khozmaga, in boxes. I liked working with her more, because it was already packaged, and it remained only to mix the components. And she dried quickly than acquired on the company.
 After a complete drying of the soldered body kit made a propyl in it, separating the product to three parts: rear wings and a back, a rashhead with a podswing, front wings and front. Caution, slightly going down and pulling out with arms with hint, separated the product in parts without much effort from the nerd.
Now, removing the part, began to process them separately, bringing to the desired result. In general, ordinary preparatory and paint work on the "all" technology: first coarse grinding with the removal of large resin and fiberglass bulbs; Then the painstaking embezzlement with a putty with fiberglass recesses; Next, grinding the outer surface and primer with a plasticizer. In conclusion - painting "metallic" and a coating with a varnish with a plasticizer.
The boyfriend also cut off and put it in a distant corner - just in case. Bidding attached to specially made and welded "on the place" fasteners on the frame.
At the end, it was welded from thin-walled steel pipes with an outer diameter of 20 mm front and rear trunk, and in addition to them - and "kenguryatniki" replacing bumpers.
The main data of the Quadrocycle:
Mass, kg ............................................................ 430
Length, mm ............................................. 2300
Width, mm.
(on the outer sidewalls of tires) ......... 1250
Height, mm:
ruly ..............................................1250
on the saddle ........................................................... ..900
Road clearance, mm ........................ .300
Base, mm ................................................ 1430
Pitch, mm ............................................. 1045
Maximum speed, km / h ................65
S. Plenthen, G. Steen, Perm Region


")

