Since then, when the phrase about the state of Russian roads came out from the pen of Gogol, the problem has not become less urgent. As before, in some of the God-forsaken corners of the country, people generally forgot to dream of asphalt pavement. The only way out is to change to ATVs. Alas, the models offered by car factories are not able to satisfy the needs of motorists from the provinces. The common people need a small-sized, economical, and, of course, a cheap off-road vehicle. Only in a home workshop from scrap materials can such a dream come true.
Materials and components for the all-terrain vehicle on tracks
It would be fair to warn in advance that power units removed from vehicles are causing increased fuel consumption. But in comparison with motorcycle engines, they have a noticeable power reserve. The production of tracks also entails additional costs.
The body of a homemade all-terrain vehicle is best constructed from aluminum or duralumin sheet. It will be necessary to purchase triplex glass, liquid rubber (can be replaced with silicone grease). The main material for the tracks will be a sheet (or strip) of rubber. One pair of bridges borrowed from Soviet cars - "Zaporozhets" or "Zhiguli".
You can highlight important points that should be taken into account in the process of creating an all-terrain vehicle on tracks.
For a homemade body, there are requirements such as strength, tightness and streamlining by the oncoming air flow while driving. In terms of geometry, the best solution would be a flat-bottomed boat body.
In view of the fact that you will have to travel (more precisely - "caterpillar") swampy areas or even overcome shallow bodies of water, the body should contain a minimum of seams. In other words, instead of welding, a solid sheet must be bent, giving the desired shape. The metal sheet is used for the manufacture of not only the cab, but also all the compartments, including the one that is intended for the engine. To exclude the harmful effect of water with a moisture-proof material (for example, rubber), they reliably cover the joints and fasteners of the nodes. Particular care should be taken to protect the battery and wiring as much as possible from moisture. It is better if special mines are allocated for them.
The rigidity of the structure of the cross-country vehicle must be provided by a frame made of steel pipes. The axles and engine will be installed and secured on a frame made of copper tubing.
Make holes in the body for leading out the bridges. Seal the joints of the axle shafts and the body (in the holes) thoroughly with rubber couplings.
The highlight of this all-terrain vehicle is the presence of a caterpillar track, without which it is difficult to imagine movement on any off-road and even swimming. The treadmill is cut from rubber sheet and looped back. When calculating the dimensions of the caterpillar, measure the distance between the shafts, which are driving. An important element that makes it possible to easily overcome any dirt are the lugs, which are riveted on the outside of the track. And if they are made in the form of small blades, then the lugs will play the role of blades when the caterpillar is immersed in the water. This idea is not difficult to implement with a thick aluminum sheet at hand. Next, you need to measure the width of the wheels. You will need this value when calculating the distance between adjacent stop elements that are attached to the inside of the track. The center of each wheel, as here http://modelist-konstruktor.com/, must exactly coincide with the center line of the track and, thus, the wheel will be located between the stops.

The taut state of the tracks can be ensured in the following way: fill the space between the bridge wheels with the driven wheels.
The final stage is to equip the cabin with laminated glass (triplex or duplex) with rubber mountings. All-terrain vehicles - homemade products on tracks, the drawings of which are in this article, are popular with creative people.
Minsk resident Boris Karavkin. And recently Yuri Pidgaetsky from Molodechno decided to build an interesting homemade tracked all-terrain vehicle from a "Muscovite" and Volkswagen. What came out of the symbiosis of components and assemblies of Soviet and German cars, read our material.
"Come to Molodechno, we have made a tracked all-terrain vehicle here" - such a message came to the editorial mail recently. The designer did not manage to send the photos, so until the very last moment we had no idea what we were going to shoot.

And when we drove up to Yuri's house, they just fell out of the sediment from his all-terrain vehicle. This is something incredible live! It seems that the car arrived in Molodechno straight from the set of films about zombies, the apocalypse or Mad Max.

Below - a caterpillar "cart", on top - a shortened body from "Moskvich-2141", painted in a military khaki color. Live car looks very unusual. This has never happened before in our "Autoexotics" section!

“I have been fond of homemade products since childhood, I went to the circles of model designers,” says Yuri Pidgaetsky. I know - it's just that my hands are always itching to do something like that ... "

Before the trip, we will study the technical component of the "monster". A car was made without drawings - by eye. A solid frame is assembled from shaped pipes, sheathed with tin. A shortened body of a "Muscovite" was later installed on it. Yuri says that he fiddled with him the most.

The radiator and stove are located at the front. There is still room under the hood for various little things. So the car has almost two trunks.

There is no back row of seats. Instead, there is a huge trunk, under which the power unit and transmission are hidden. As you can see, the all-terrain vehicle turned out to be very practical.

The most interesting thing is hidden under the boot floor. The gasoline 1.8-liter engine from the old Volkswagen Passat is located almost in the middle, but unlike a passenger car, it is not located transversely, but longitudinally. Next comes the 5-speed gearbox from the same car with a welded differential.


From it - a kind of cardan to the rear "Zhiguli" bridge. The exhaust pipes are welded from scratch, the fuel tank is homemade.


The rear axle differential is naturally free. The torque is transmitted to the rear rollers. They also have brake discs from the old Volkswagen Golf.
As you already understood, brakes are needed not only to stop the car, but also to control it. We pull on the right control lever - we act on the caliper of the right roller, as a result, the car turns to the right. We pull the left lever towards ourselves - we turn to the left. There is no brake pedal - to brake, you need to pull on both levers.


Yuri made a caterpillar from a conveyor belt and metal shaped tubes for a week and a half. Conventional car rims are used as rollers. Each track has a tensioning mechanism. According to the craftsman, the suspension is made from what was - on each side there are three struts with springs and shock absorbers.

Interior elements are taken from the same "Muscovite". Everything works inside, including the radio and the stove. Conventionally, the number of seats can be defined as 2 + 1 - in the cabin, albeit in tight quarters, but three of us can accommodate. Gear shifting is reversed.
Now hold on to the chair - Yuri's all-terrain vehicle can swim! Everything is sealed inside - the "Muscovite" does not sink. True, so far there has not been enough courage for full-fledged water tests. The car drove into the lake, but held on to the bottom with the back of the caterpillar. The front of the all-terrain vehicle did not sink! In general, the car should float, but Yuri has no desire to fully launch it into the water - it's a pity to drown such a technique.

The armor is strong and our tanks are fast - we are going to test the equipment in the fields! By the way, the all-terrain vehicle has not yet been properly tested - Yuri drove it only a few times. So we, together with the designer, will probe its capabilities, positive and negative qualities.


But first you need to get into the car, and for this - remember the army days. You need to climb on a car just like in the army on an infantry fighting vehicle, that is, as you can, you climb.
First comment after our Instagram post: "Will the ATV roll forward with emergency braking?" We braked at low speeds - we didn't roll over. Still, despite the considerable height, the center of gravity is located low - where the engine, rollers and tracks are. Before us, Yuri developed a maximum speed of 60 km / h, braked, but not urgently - the car did not overturn. To brake strongly at high speed while there is no desire - first you need to install three-point belts and a roll cage. It seems that the car should not turn over, but in order to check this for sure, it is better to work on safety first. So, just in case.
You sit behind the wheel, ugh - with levers, very high. There has never been such a tall "Muscovite" in history! The cabin is very noisy while driving, but it cannot be said that this is a drawback. Noise enhances the emotion of driving. You really drive like in a tank.

I always dreamed of traveling on tracked vehicles, it's a pity I didn't manage to steer anything in the army. It's time to catch up!
The clutch and gas are just like in a normal car, nothing special. It is difficult to find the gears, the switching scheme is inverted, which blows up the brain, there are also problems with clarity, but you can choose any gear, because the car starts off at any speed, at least from third for sure. There is no "lowering" in the transmission, the lowered row in this car is already made by default, so in first gear you can climb at the speed of a turtle.

I turn on the gear (though I don’t know which one), abruptly let go of the clutch pedal and press on the gas - the car slightly rears up and starts abruptly with a noise! To be honest, I don't even know how to describe emotions. This is something incredible! There is very little snow, there are no special obstacles, but from the ride on this "monster" you just want to scream with delight! A very unusual feeling. The engine is roaring, the tracks are pounding, my heart is bursting out of my chest - this is the most emotional test drive of my career! Words cannot describe how cool it is to ride this self-made caterpillar.

To turn, you need to put a lot of effort on the levers. But the maneuverability is not bad: we squeeze the "gas" to the floor, abruptly pull the left lever with all our strengths with both hands - the all-terrain vehicle starts turning the "dimes" in place! Moreover, homemade tracks do not fall off the rollers - the strength of the structure is felt.

Immediately I remember the famous obscene video about a warrant officer and tankers: "Once, with a turn, turned on the front - and went!"


Off-road performance? The ground clearance is 380 mm, there are no overhangs, but there are tracks. It is a pity, for some reason there was very little snow in Molodechno - it was not possible to check how the car drives through deep snow. But again, there is enough emotion without off-road obstacles. You just go - and your eyes are already on your forehead!
But we drove along the ditch - the all-terrain vehicle passes through it very well. But so far Yuri has no idea when the car will start to fall back. Therefore, they did not take large slides - the driver is simply afraid to turn the all-terrain vehicle over.

In theory, everything should be fine - the center of gravity is low. But in practice, you need to make a frame, belts - and even then try to feel the stability limit of the all-terrain vehicle. There is a feeling that he is capable of a lot, but so far it is simply scary to break him - so much work has been invested in the technique.


Finally, we still try to feel this edge again, but on the rise, the connection between the rollers and the engine is unexpectedly lost! The all-terrain vehicle rolls back - and remains on the ice, which is covered with cracks along the edges. An attempt to turn on the gear and move off leads nowhere. Only the grinding of metal is heard - the car does not drive. Have sailed!

It turned out that the cardan had torn. Moreover, he broke on the first test. However, you shouldn't even worry about it - Yuri already has a solution to the problem. The next propeller shaft will be strong enough to take it all.

It is normal when something goes wrong with new technology. While the all-terrain vehicle has only one weak point, there are no other "snot". And this is very good! The machine was built from scratch by one person, has not yet been tested - and only the drive breaks down. In the evening of the same day, the designer repaired the all-terrain vehicle and drove out of the ditch.

As a result - a complete delight. You are simply amazed at the talent of Yuri Pidgaetsky, who made such a car from scrap materials! He had some spare parts, he had to buy something - in the end, he spent about $ 800 on the construction. For this money, you can't even buy a frail ATV, but here you get a whole "monster" - an all-terrain vehicle on a caterpillar track. Bravo to its creator!
Yuri GLADCHUK
Photo and video by Anton SHELKOVICH
site
If you own an interesting car (or homemade product) or know such people, contact the editorial office and become the hero of the next article.
"Parma" cuts through the swamps and impassable roads of our vast country.
All data are taken from the forum of the site "Lunokhodov.Net", where he shares his best practices and skills under the nickname mishanya68.
The tasks originally assigned to the all-terrain vehicle builder.
The technical requirements and wishes include the following items:
1. confident movement on snow of average depth and density for the Urals.
2. capacity for 2 people, plus 50-80 kg of cargo.
3. minimum, should be confident in the water (main application is fishing and buoyancy for safety).
4. The main application is snow and ice 90%, the rest is autumn and spring is snow with mud.
5. maximum use of ready-made serial parts and assemblies.
In connection with this project, I once again re-read the topics on "Tazik", "Luntik", "Barsik" and "Yukon" - these are ready-made all-terrain vehicles described on the site "Lunokhodov.Net". Many thanks to the authors of the projects for sharing their experience, best practices and drawings that they used.
Based on the experience of previous builders, outlined an approximate design
1. turn on a differential with a rear axle, but put a cylindrical one.
2. The engine is 2-cylinder, made in China with a cylinder capacity of 690 cubic mm.
3. transmission: belt variator - gearbox from VAZ 5-speed - rear axle from VAZ.
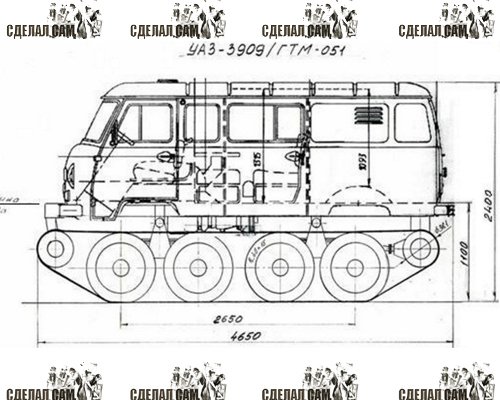
4. dimensions 2500x1750 mm.
The rear axle is taken from the classic "Zhiguli". Sprockets are worn instead of wheels (drive wheels for caterpillars)
The beam was used. From disassembly, after checking for straightness, I cut off the excess and immediately cleaned it, cleaned it with petal circles with 40 grain. It turned out quite quickly, 1.5-2 hours for everything, and the cleaning took about 30 minutes. But this time is then saved on welding and painting.
The engine is made in China.

Drawings have been developed for the production of guides, which are fixed to the inner side of the track belt and prevent the tracks from coming off during movement and turns.

Factory half shaft.

The half-axle is bought, find the difference! Therefore, it was decided to leave the factory axle shafts, but with the replacement of bearings.

I bought belts for the production of caterpillars in a rubber goods store at a repair plant in Perm.
More details: what is "increased strength" ??? In numbers. 4 spacers are good, 12 mm is not a lot?
The strength of the tape is created by the gaskets - the rest is rubber, which itself does not bear a load, BUT protects the gaskets from damage. For example, I took one so that on one side (outer) it was 3-4 mm, and on the other (inner) - 1 mm. From the inside, damage is practically not expected, and the extra thickness means excess weight and not small! As for the spacers - they are ALWAYS of the same thickness - 1mm, the rest is from their number!
By area: I took 4 pieces. with a length of 6.5 m, width-150mm, thickness-8mm, ply-7. It turned out to be 10 thousand rubles.

He began to cook the frame of the future all-terrain vehicle. Someone calls a frame, someone a boat, someone a frame, and the author calls this structure a keel, since the all-terrain vehicle is more intended for navigation.

The rounded front keel should improve the floating quality of the car.

It was decided to make an all-terrain vehicle without a balancer, as it is intended for travel in winter, the roads are smoother, the weight of the structure is reduced, and it is technically easier to execute.

The frame is assembled with road wheels on both sides, the wheels are the most common and common with R 13 from the VAZ, the bottom of the star is raised from the floor level by 350 mm, the wheel is 570 mm in diameter.

Preparing tracks for making tracks.

Mounting plates.

Drilling template.

Pre-drilled holes in the conveyor belts for making the caterpillar.

Drilling holes according to the template.

Assembly.

A device for drilling holes in rubber using the punch method, but here you do not need to hit the punch, it is clamped into the drill chuck and the rubber is cut, very good holes are obtained and less effort is needed.

You can watch the video how this is done.
Photo of the device clamped into the drill chuck.

Photo of a device for folding pressure plates and bent plates.

One caterpillar is ready.

Safety precautions. In order not to hurt to beat against the ends of the pipe and not to scratch, it is better to protect yourself, at least with gloves.

The caterpillar is wrapped around the sprocket, all tracks are in contact with the teeth.

Front view.

The tensioning mechanism is made so that both sloths are tensioned at the same time, there are pros and cons to this method. Plus the largest - the same tension of the tracks, provided that the tracks are the same during manufacture and are equally stretched, simplicity in execution and more reliable fastening of the sloth axis. Subject to these conditions, the straightness of the ride is ensured.
Cons - poor sealing of the boat, since the sloth shaft passes inside the boat, if one caterpillar flew off, then both sides relax in order to put on. Also, to be removed for repair if necessary.

Plates for fastening tensioning mechanisms.

Beams and reinforcements are welded.

Fastening the bridge.

Installation of disc brakes on the axle from the VAZ, due to the braking of the driving wheels, the all-terrain vehicle will turn while driving.

The guides are from the inner side of the caterpillar, on the upper bend along the edges of the canine, they are pressed by 9 mm, this is with a plate width of 40 mm, the steel thickness is 2.5 mm. this is the limit for a press with a force of 10 tons.

Guides, with a plate welded inside for attaching to tracks.

Tool for making guide plates using a press.

This will guide the track along the tension wheel.

The guide plate touches the brake hose from the disc brakes on the sprocket, so you need to change the brake hoses and install them from the "Niva".

Clearances for the track to run over the track sprocket are acceptable.

All plates are chopped and folded.

The caterpillar is the most labor-intensive and labor-intensive part of the all-terrain vehicle.

The caterpillar and sprocket must interact with each other without jamming in and out of the star. Verification completed.

Watch the video.
Installing the engine.

Installing the clutch and gearbox.

Installing the cardan.

The variator on the engine pulley. Transmission - so far only positive results, the Kayurov variator works with the Chinese engine very clearly. At first, there were problems with releasing the belt at idle, but after adjusting the carb, everything returned to normal. Releases completely at about 1000-1100 engine rpm, setting at about 1500-1700 rpm. Fully compressed by about 2500-2800 rpm.
I could not understand why by ear the maximum revs are less than 3000 rpm, then I saw the throttle limiting bolt turned completely, the Chinese, apparently, tightened it for a quiet break, and also completed the control levers.

The first departure took place. First impressions are great.
Everything I said about differential rotation is not entirely true. There are moments about which a little later. The all-terrain vehicle turned out so far quite light and nimble.
He rolls around the garage with his hands into one, turns into 2 people. In the video, the surface is packed with snow, the first and third of the gas transmission, I press the levers with one finger, there is almost no noise from the stars.
I finished working with the controls (gear shift and gas drive), and also made a frame for protecting the cardan. I made a small trip. Now everything works well. Tomorrow I will disassemble everything for welding the boat and painting.


Dismantled the all-terrain vehicle for welding and painting.

I turned it over on my back.

I boiled the bottom, the sides remained and can be painted.

The braces are installed.

The pulley shaft is inside the casing.


Boiled sides and painted.

I painted everything inside.

Gearbox outside with oil filler plug and differential.
As soon as winter begins in our country, given the climate, two-wheeled vehicles are removed to the garage until spring. It is sometimes impossible to use the car for movement due to heavy snow. And here to the aid of all motorists who want to move on a snow-covered road comes a snowmobile on tracks, which can be made from a walk-behind tractor with your own hands.
Not everyone has the opportunity to buy an additional vehicle, but everyone can independently design a homemade tracked snowmobile from a walk-behind tractor.
Advantages and features of a homemade snowmobile

- The vehicle has a mechanical drive and a tracked walk-behind tractor, when driving on which, you will not get stuck in snowdrifts.
- The steering comes from the skis, and the steering system is in front, so you can easily control it.
- The price when buying a particular vehicle is important. Therefore, if you count, the cost of making a snowmobile yourself will be five times lower than buying it from the manufacturer. And it will come out even cheaper due to the available walk-behind tractor and other parts.
- Reliability - where a person does not pass and a car does not pass, the snowmobile will overcome all obstacles with ease.
- If the snowmobile is made by hand, then the designer approaches the choice of parts very carefully. By doing everything yourself, you are responsible for the quality of your design. In addition, by paying great attention to the components of the mechanism, you make the snowmobile all-round.
The device of a homemade motoblock snowmobile
This is a sought-after invention that you can make yourself if you have quality parts. The walk-behind tractor is taken partially (separate parts) or used completely. If you decide to use it not fully loaded, you need to weld on it a base frame with a rear axle, steering fork and wheels. The most difficult stage in this case is the transformation of the working shaft of the walk-behind tractor into a drive gear.
The most practical and versatile solution in the manufacture of self-propelled vehicles will be the use of parts from the walk-behind tractor. You only need to remove the steering fork and the engine from the finished walk-behind tractor.
The motor can be positioned at the rear of the structure.
Before starting the independent manufacture of the structure, draw a drawing, collect all the necessary material, prepare the tool, and you can start. The design is quite simple and any person can handle it; technical education and any skills are not required for this.
If you did not graduate from the Faculty of Engineering and it is difficult for you to draw up a drawing, use ours.

Drawing of a simple frame for a homemade snowmobile
The drawing shows the frame that you will need when making the snowmobile.
A walk-behind tractor in a homemade tracked snowmobile is the main part due to which your vehicle will move.
If everything is done correctly according to the drawing, you will have a goose-based snowmobile.

Snowmobile frame drawing on tracks
DIY crawler snowmobile making
Before starting work, decide on the tool. We can say with 100% certainty what you need: various screwdrivers, a hammer, welding, a pipe bender (if there is no ready-made frame).
Before preparing a blueprint for making your own snowmobile, familiarize yourself with the standard configuration.
- Frame. Every snowmobile has a frame: the more complex the structure, the more reliable and sturdy the frame must be. The best option is to take from an ATV, scooter or motorcycle. If there is no such part, you can weld it yourself from pipes with a diameter of at least 40 mm.
- Seat. The riding position on the snowmobile must be firm, as the structure itself is quite low.
Prerequisite: the seat must be made of waterproof material.
- Engine. When choosing an engine, pay attention to its power. If you want a powerful sled, then the engine must be that.
- Tank. A container with a volume of 10-15 liters, made of metal, is perfect for a fuel tank.
- Skis. If you do not have ready-made skis that can be adapted for a snowmobile, you can make them yourself from wood. It is better if it is at least nine-layer plywood.
- Steering wheel. When choosing a steering wheel, consider your convenience. It is best if it is borrowed from a two-wheeled unit.
- Caterpillars. Making tracks is perhaps the most difficult part of the entire self-propelled vehicle.
- Drive unit. For the tracks to spin, you need a drive - the best way to do this is to use a chain from a motorcycle.
Frame
If a ready-made frame is not available, then it is easy to weld it from a profile pipe, and to shape it using a pipe bender.
If you cannot independently make calculations and draw up a drawing, then for example, use the drawing from our website.
Once the frame is assembled, treat it with an anti-corrosion agent and paint it with quality paint that will withstand both moisture and frost.
Caterpillars
Everyone who previously independently designed a tracked walk-behind tractor notes: making tracks is the most difficult process in a homemade product.
The easiest way to construct them is from car tires. This option is the most advantageous - high-quality and low-budget. The part is manufactured in a closed circle, so a tire rupture cannot occur.

Tracks for a snowmobile from a tire (tires)
Caterpillar manufacturing instructions:
- From a car tire: we take the tire and cut off the sides (it is better to do this with a sharp knife). You need to cut so that the flexible part with the protector remains.

"Today we will look at detailed step-by-step instructions for assembling a homemade tracked all-terrain vehicle" Ulan-3 " This tracked all-terrain vehicle is assembled entirely from components and assemblies of domestic production, borrowed from cars and motorcycles, the only engine was bought by a new "Lifan" 22 l / s. assembled from a conveyor belt, and metal corners are used as tracks, the caterpillar is connected to each other through a metal loop. Wheels from VAZ are installed as road wheels. Motorcycle gearbox « « Cardan shaft from a potato digger with a gear ratio of 1.25. Planetary brake with a gear ratio of 4 per disc brake. The weight of the car is about 650 kg.
Main bridge.
 Reducer and planetary gear.
 Installing the engine on the frame of the all-terrain vehicle.
 A flexible coupling will be installed between the gearbox and the rear axle.
 The clutch is assembled from the clutch discs of the Ural motorcycle. Torque is transmitted by a chain drive.
 The body of the all-terrain vehicle.

 Drive sprocket canine flexor.


 Conveyer belt.
 A caterpillar is assembled, the master uses a corner as a track.


 Here is such a wonderful tracked all-terrain vehicle turned out, you can go fishing, hunting, in the forest-taiga for mushrooms and berries. Due to the sealed boat hull, it can float on water. Also, be sure to look at how the clutch made from the clutch discs of the Ural motorcycle is arranged. Enjoy your look.